File Explorer shortcuts

The following list of File Explorer shortcuts allows you access folders, navigation pane, search bar, address bars and more.

  • Alt + D  –  Select address bar.
  • Alt + Enter  –  Open Properties settings for the selected item.
  • Alt + Left arrow key (or Backspace)  –  View previous folder.
  • Alt + P  –  Display preview panel.
  • Alt + Right arrow key  –  View next folder.
  • Alt + Up arrow  –  Move up a level in the folder path.
  • Ctrl + E (or F)  –  Select search box.
  • Ctrl + F (or F3)  –  Start search.
  • Ctrl + L  –  Focus on the address bar.
  • Ctrl + Mouse scroll wheel  –  Change view file and folder.
  • Ctrl + N  –  Open new window.
  • Ctrl + Shift + E  –  Expands all folders from the tree in the navigation pane.
  • Ctrl + Shift + N  –  Creates a new folder on desktop or File Explorer.
  • Ctrl + Shift + Number (1-8)  –  Changes folder view.
  • Ctrl + W  –  Close active window.
  • End  –  Scroll to the bottom of the window.
  • F11  –  Switch active window full-screen mode.
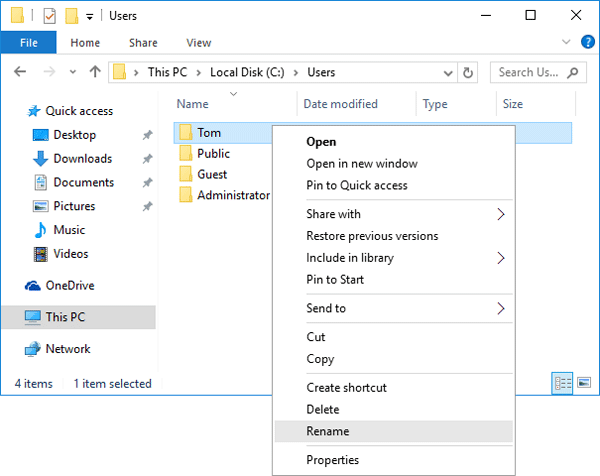
  • F2  –  Rename selected item.
  • F4  –  Switch focus to address bar.
  • F5  –  Refresh File Explorer’s current view.
  • F6  –  Cycle through elements on the screen.
  • Home  –  Scroll to the top of the window.
  • Windows key  + E  –  Open File Explorer.

Desktop shortcuts

The following desktop keyboard shortcuts allows you to efficiently open, close, navigate, and perform tasks across the desktop environment, including the Start menu, Taskbar, Settings, and more.

  • Alt + Esc  –  Cycle through open windows.
  • Alt + F4  –  Close active window. (If no active window is present, a shutdown box appears.)
  • Alt + F8  –  Reveals typed password in Sign-in screen.
  • Alt + Left arrow key  –  Go back.
  • Alt + Page Down  –  Move down one screen.
  • Alt + Page Up  –  Move up one screen.
  • Alt + Right arrow key  –  Go forward.
  • Alt + Spacebar  –  Open context menu for the active window.
  • Alt + Tab  –  Switch between open apps while pressing Tab multiple times.
  • Alt + Underlined letter  –  Runs command for the underlined letter in apps.
  • Ctrl + Alt + Tab  –  View open apps.
  • Ctrl + Arrow keys  –  Change Start menu size.
  • Ctrl + Arrow keys (to select) + Spacebar  –  Select multiple items on desktop or File Explorer.
  • Ctrl + Click a grouped app button  –  Cycle through windows in the group from the Taskbar.
  • Ctrl + Down arrow key  –  Move the cursor to the beginning of the next paragraph.
  • Ctrl + F5 (or) Ctrl + R  –  Refresh current window.
  • Ctrl + Left arrow key  –  Move the cursor to the beginning of the previous word.
  • Ctrl + Right arrow key  –  Move the cursor to the beginning of the next word.
  • Ctrl + Shift  –  Switch keyboard layout.
  • Ctrl + Shift + Arrow key  –  Select block of text.
  • Ctrl + Shift + Click app button  –  Run app as administrator from the Taskbar.
  • Ctrl + Shift + Esc  –  Open Task Manager.
  • Ctrl + Spacebar  –  Enable or disable Chinese IME.
  • Ctrl + Up arrow key  –  Move the cursor to the beginning of the previous paragraph
  • Shift + Arrow keys  –  Select multiple items.
  • Shift + Click app button  –  Open another instance of an app from the Taskbar.
  • Shift + F10  –  Open context menu for selected item.
  • Shift + Right-click app button  –  Show window menu for the app from the Taskbar.
  • Shift + Right-click grouped app button  –  Show window menu for the group from the Taskbar.

Windows Key Options

The “Windows key,” when used with other keys, enables you to execute numerous handy tasks such as launching Settings, File Explorer, the Run command, and apps pinned to the Taskbar, as well as open specific features like Narrator or Magnifier. Additionally, you can manage windows and virtual desktops, take screenshots, lock the computer, and more.

Here is a list of the most common keyboard shortcuts utilizing the Windows key.

  • Windows Key   –  Open Start menu.
  • Windows Key  + A  –  Open Action center.
  • Windows Key  + Alt + D  –  Open date and time in the Taskbar.
  • Windows Key  + Alt + Number (0-9)  –  Open Jump List of the app in number position in the Taskbar.
  • Windows Key  + B  –  Set focus notification area in the Taskbar.
  • ​​​​​​​Windows Key  + Comma (,)  –  Temporarily peek at the desktop.
  • Windows Key  + Ctrl + D  –  Create a virtual desktop.
  • Windows Key  + Ctrl + Enter  –  Open Narrator.
  • Windows Key  + Ctrl + F  –  Open search for the device on a domain network.
  • Windows Key  + Ctrl + F4  –  Close active virtual desktop.
  • Windows Key  + Ctrl + Left arrow  –  Switch to the virtual desktop on the left.
  • Windows Key  + Ctrl + Number (0-9)  –  Switch to the last active window of the app in the number position in the Taskbar.
  • Windows Key  + Ctrl + Q  –  Open Quick Assist.
  • Windows Key  + Ctrl + Right arrow  –  Switch to the virtual desktop on the right.
  • Windows Key  + Ctrl + Shift + B  –  Wake up the device when black or a blank screen.
  • Windows Key  + Ctrl + Shift + Number (0-9)  –  Open another instance as an administrator of the app in the number position in the Taskbar.
  • Windows Key  + Ctrl + Spacebar  –  Change previous selected input option.
  • Windows Key  + D  –  Display and hide the desktop.
  • Windows Key  + Down arrow key  –  Minimize app windows.
  • Windows Key  + E  –  Open File Explorer.
  • Windows Key  + Esc  –  Exit magnifier.
  • Windows Key  + F  –  Launch Feedback Hub app.
  • Windows Key  + Forward-slash (/)  –  Start IME reconversion.
  • Windows Key  + G  –  Launch Game bar app.
  • Windows Key  + H  –  Open dictation feature.
  • Windows Key  + Home  –  Minimize or maximize all but the active desktop window.
  • Windows Key  + I  –  Open Settings.
  • Windows Key  + J  –  Set focus on a tip for Windows 10 when applicable.
  • Windows Key  + K  –  Open Connect settings.
  • Windows Key  + L  –  Locks computer.
  • Windows Key  + Left arrow key  –  Snap app or window left.
  • Windows Key  + M  –  Minimize all windows.
  • Windows Key  + Minus (-)  –  Zoom out using the magnifier.
  • Windows Key  + Number (0-9)  –  Open the app in number position in the Taskbar.
  • Windows Key  + O  –  Lock device orientation.
  • Windows Key  + P  –  Open Project settings.
  • Windows Key  + Pause  –  Show System Properties dialog box.
  • Windows Key  + Period (.) or Semicolon (;)  –  Open emoji panel.
  • Windows Key  + Plus (+)  –  Zoom in using the magnifier.
  • Windows Key  + PrtScn  –  Capture a full screenshot in the “Screenshots” folder.
  • Windows Key  + R  –  Open Run command.
  • Windows Key  + Right arrow key  –  Snap app or window right.
  • Windows Key  + S (or Q)  –  Open Search.
  • Windows Key  + Shift + Down arrow key  –  Windows 11: Restore the window if it is snapped or maximized. Windows 10: Maximize or minimize active windows vertically while maintaining width.
  • Windows Key  + Shift + Left arrow key  –  Move active window to monitor on the left.
  • Windows Key  + Shift + M  –  Restore minimized windows on the desktop.
  • Windows Key  + Shift + Number (0-9)  –  Open another app instance in the number position in the Taskbar.
  • Windows Key  + Shift + Right arrow key  –  Move active window to monitor on the right.
  • Windows Key  + Shift + S  –  Create part of the screen screenshot.
  • Windows Key  + Shift + Up arrow key  –  Stretch desktop window to the top and bottom of the screen.
  • Windows Key  + Shift + V  –  Cycle through notifications.
  • Windows Key  + Spacebar  –  Change keyboard layout and input language.
  • Windows Key  + T  –  Cycle through apps in the Taskbar.
  • Windows Key  + Tab  –  Open Task View.
  • Windows Key  + U  –  Open Ease of Access settings.
  • Windows Key  + Up arrow key  –  Maximize app windows.
  • Windows Key  + V  –  Open Clipboard bin.
  • Windows Key  + W  –  Open the Windows Ink Workspace.
  • Windows Key  + X  –  Open Quick Link menu.
  • Windows Key  + Y  –  Change input between desktop and Mixed Reality.
  • Windows Key  + Z  –  Switch input between the desktop experience and Windows Mixed Reality.

Surface Screen Problems

How to Restart Video Driver in Windows 10

Windows 10 comes with a special keyboard shortcut which allows restarting graphics drivers without ending your user session. The method supports NVIDIA, AMD, and Intel drivers.

To restart a video driver in Windows 10, do the following.

  1. Press the Win + Ctrl +Shift + B keys.
  2. The screen will go blank for a second and you will hear a beep.
  3. Everything will go back to normal immediately.

Let’s troubleshoot and isolate this issue together.

  • Will you confirm the Surface device do you have? a Surface Laptop or a Surface Pro?
  • May I know what version of Windows your device is currently running?

Here are some steps you can try:

1. Show Hidden Devices in Device Manager:

  • Open device manager.
  • Go to the View tab and select Show hidden devices.
  • Then, go to the Actions tab and choose Scan for hardware changes.
  • Check if the HID-compliant touch screen appears under Human Interface Devices now.

2. Boot to UEFI and test touch functionality. Unified Extensible Firmware Interface (UEFI) is a type of software that helps Windows communicate with your Surface’s hardware. Because UEFI operates independently of Windows, testing hardware in UEFI will work if you have a hardware issue.

  • Follow these steps to boot to UEFI and test touch functionality:
    1. Go to Start > Power > Shut down.
    2. When Surface is off, press and hold the volume up button and press the power button until a Microsoft or Surface logo appears onscreen.
    3. Once you are in UEFI, touch your Surface screen and see if it responds normally. Try to navigate in UEFI by tapping various menu items

Surface Touch Pad

Surface Touchpad Not Working

Here are some potential causes and solutions for a non-functional Surface touchpad:

  1. Dust or dirt on the touchpad: Check the touchpad for any debris or obstructions. Clean it gently with a soft cloth or a can of compressed air to ensure proper functionality.
  2. Outdated drivers or firmware: Ensure your Surface is running the latest Windows updates and Surface drivers. You can check for updates in Settings > Update & Security > Windows Update (Windows 10) or Settings > Update & Security > Windows Update > Optional updates (Windows 11).
  3. Touchpad settings: Adjust the touchpad settings to see if it resolves the issue. On Windows 10, go to Start > Settings > Devices > Touchpad. On Windows 11, go to Start > Settings > Bluetooth & devices > Touchpad. You can toggle settings like tap delay, gesture recognition, or disable accidental touches.
  4. Connection issues: If your touchpad connects via Bluetooth, try disconnecting and reconnecting it. For Surface devices with a Type Cover, ensure it’s properly attached and detached.
  5. Battery depletion: If your touchpad connects via Bluetooth and stops working, it might be due to low battery power. Check the battery level and recharge or replace the batteries as needed.

Additional Tips

  • If you’re experiencing issues with text selection, try using an external mouse to see if it functions correctly. This can help isolate the problem.
  • If none of the above solutions work, you can try resetting the touchpad settings to their default values or seeking further assistance from Microsoft Support.

Remember to always refer to the official Microsoft documentation and support resources for the latest information and guidance on troubleshooting and maintaining your Surface device.

Fix touchpad problems in Windows 10

If your touchpad isn’t working, it may be a result of a missing or out-of-date driver.

  • On Start Windows logo Start button, search for Device Manager, and select it from the list of results. Under Mice and other pointing devices, select your touchpad, open it, select the Driver tab, and select Update Driver. If Windows doesn’t find a new driver, look for one on the device manufacturer’s website and follow their instructions.
  • If those steps didn’t work, try uninstalling your touchpad driver: open Device Manager, right-click (or press and hold) the touchpad driver, and select Uninstall. Restart your device and Windows will attempt to reinstall the driver.
  • If that didn’t work, try using the generic driver that comes with Windows. Here’s how: in Device Manager, right-click (or press and hold) your touchpad driver > Update driver software… Browse my computer for driver software > Let me pick from a list of device drivers on my computer, select HID compliant mouse, select Next, and follow the instructions to install it.
  • If changing your driver doesn’t help, there may be a problem with the touchpad itself. Contact your PC’s manufacturer for help.

Rename User Profile Directory

How to Rename User Profile Directory in Windows 11, 10, 8 and 7

Renaming a user account in Windows won’t automatically rename the associated user profile folder. In this tutorial we’ll show you how to manually rename user profile directory in Windows 11, 10, 8 and 7, if the name of your user account folder is not what you want.

How to Rename User Profile Directory in Windows 11, 10, 8 and 7?

To make sure your renaming of user profile folder is consistent across the entire installation of your Windows and does not break anything, follow these steps:

  1. Log on to another Administrator account that is not the account being renamed.
  2. Open the Windows Explorer and browse to the C:\Users folder. Right-click on your user account folder and rename it to whatever you like.rename-user-profile
  3. Press the Windows key + R to open the Run box. Type regedit and hit Enter.
  4. When the Registry Editor opens, navigate to the following registry location:
    HKEY_LOCAL_MACHINE\SOFTWARE\Microsoft\Windows NT\CurrentVersion\ProfileList\
  5. Under the ProfileList subkey you will find a few subfolders (starting with ‘S-1-5-‘) that are named with the SID of Windows user accounts. Find the SID for your user account whose profile folder you just renamed. You can simply open each subfolder and check the ProfileImagePath path for the correct one.profile-image-path
  6. In the right-pane, double-click the ProfileImagePath value and change the user profile path to your desired name. In my example, I renamed the account folder from C:\Users\Tom to C:\Users\Tom_New.change-profile-path
  7. Close the Registry Editor window. Logout of the Administrator account and log in with your user account. Everything should work fine – all your apps and files should be intact and your user folder should have been renamed.

Windows Server Upgrade paths

In-place upgrade from Windows Server 20xx to a different version are shown in the table below. The following upgrade paths are officially supported by Microsoft.

Image

From the table above Microsoft does not support an upgrade from Server 2012 R2 directly to Server 2022, so it would take an intermediate step or people will have to resort to a clean install.

Whether meet the prerequisites for upgrading?

For details about the upgrade steps, please refer to the following steps: Perform an in-place upgrade of Windows Server | Microsoft Learn

What went wrong with the upgrade and can you provide a screenshot?

Best Regards,

Hania Lian

Windows 10 Explorer Fix

Windows Explorer shortcuts not working giving Error message:

Windows cannot Find, Make Sure You Typed the Name Correctly, and Then Try Again.

Today I encountered a weird issue in Windows 10 operating system. I usually open Windows Explorer by using WIN+E hotkey. When I pressed WIN and E keys together, Windows showed following error message:

[Explorer.EXE]

Windows cannot find ”. Make sure you typed the name correctly, and then try again.

Then I tried to open Windows Explorer by double-clicking on This PC icon on Desktop and it opened fine.

Finally I was able to address this annoying issue and fixed it using a very simple solution.

If you also face this problem ever, you may try following working fix:

1. Open Windows Explorer (or File Explorer or This PC) by double-clicking on its desktop icon or by clicking on its pinned icon on Taskbar. Now click on View tab in Ribbon and then click on Options.

If you are unable to open Windows Explorer and get above mentioned error message, open Control Panel and click on “File Explorer Options” icon.

2. Now check the option “Open File Explorer to:“. It would be set to “Quick access“. Click on the drop-down box and select “This PC” option.

Open_File_Explorer_This_PC_Quick_Access_Windows_10.png

3. Apply the changes and it’ll fix the problem.

Now you’ll no longer receive any error message while trying to launch Windows Explorer.

It seems a “Quick Access” related bug to me and when we disable “Quick Access” option in File Explorer options, it solves the issue.

Copilot learning

Microsoft Learn

Copilot learning hub

Copilot is an AI assistant powered by language models, which offers innovative solutions across the Microsoft Cloud. Find what you, a technical professional, need to enhance your productivity, creativity, and data accessibility, and make the most of the enterprise-grade data security and privacy features for your organization.

Start your Copilot learning journey

Latest Security Issues