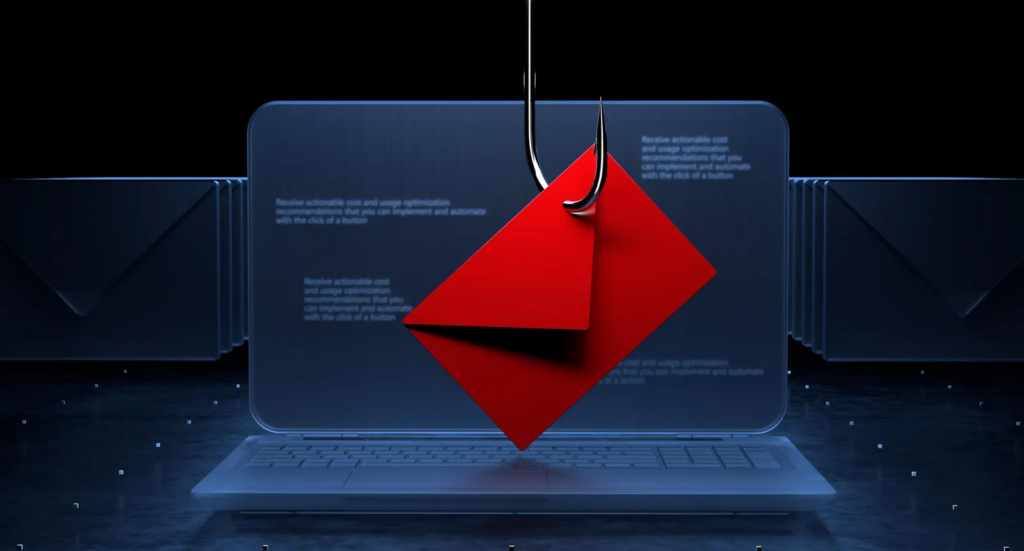
What are the effects of removing Copilot AI features.
Removing all Copilot AI features from your laptop will not harm your operating system or delete any of your files, but it will significantly change your system’s resource usage, interface layout, and data privacy footprint.
1. Performance Gains and Resource Reclaiming
Lower Idle Memory (RAM): Disabling Copilot stops background web-wrapper processes from pre-loading. Users frequently report a substantial drop in idle RAM usage, keeping more memory open for heavy apps and gaming.
Reduced CPU Spikes: Turning off localized AI scanning stops arbitrary background processing spikes. Your laptop will run slightly cooler, which can subtly extend battery longevity during daily workflows.
Snappier Office App Launches: Disabling “Connected Experiences” in Word and Excel means your apps load files locally without spending processing time pinging Microsoft servers to fetch LLM features.
2. Interface and Workflow Simplification
Zero Accidental Triggers: The Copilot sidebars, pop-up text prompts, and taskbar shortcuts are eliminated. You will no longer accidentally activate the assistant via misclicks or tracking triggers while typing.
Clean Taskbar and Menus: Stripping the apps clears out the forced search box icons and unnecessary app bloat, reverting your laptop to a traditional, minimalist Windows interface.
3. Data Privacy and Security Enhancements
Local Cloud Isolation: Disabling content analysis stops Microsoft from parsing your live local documents, text selections, and data spreadsheets for real-time contextual suggestions.
Minimized Server Pings: Your machine will drastically reduce telemetry traffic sent to external Microsoft data centers, locking down your network bandwidth and data privacy.
4. What You Will Actually “Lose”
No AI Assistance: You lose the ability to generate summaries, rewrite emails, or parse graphs natively inside Microsoft 365. Note: If you ever need AI later, you can still access the exact same tools via any standard web browser using the Microsoft Copilot Web Interface.
Broken Shortcut Keys: If your laptop features a dedicated hardware “Copilot” key, pressing it will either do nothing or default to opening a generic Windows Search box.
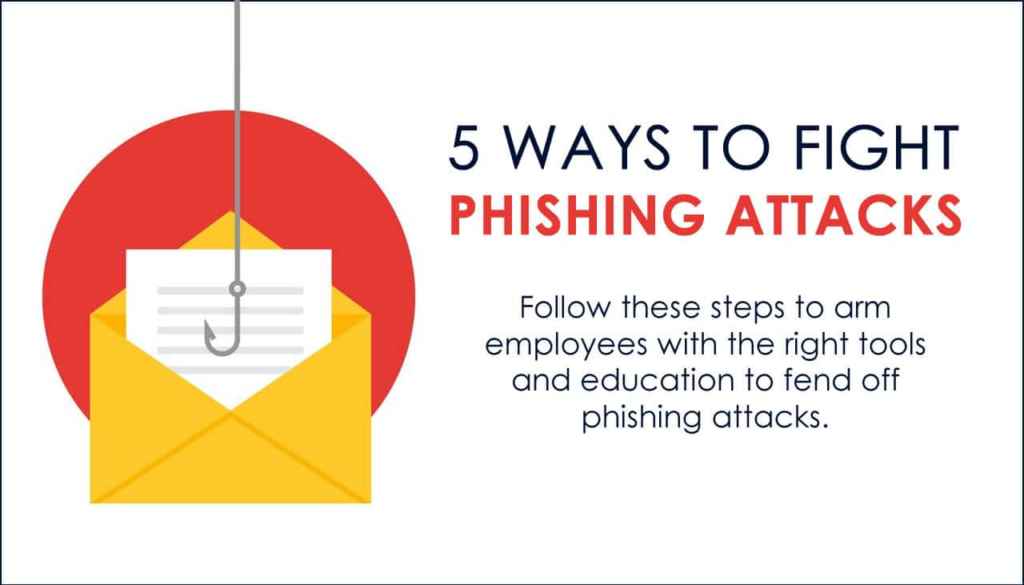
In today’s IT environment, understanding what is phishing is just as important as knowing how to configure a firewall. High‑profile data breaches have shown that attackers don’t always break in through unpatched systems—often, they simply convince a person to click.
Phishing is one of the most common cyber threats facing every organization. Because these attacks focus on people instead of technology, anyone with an email account, phone number or social media profile can become a victim.
This guide explains what phishing is, how different phishing attacks work, and practical steps you can take to protect yourself and your organization.
What is phishing?
Phishing is a type of cyber-attack in which scammers send deceptive messages—usually email, but also text messages, social media messages, or phone calls—to trick a target into sharing sensitive information or installing malicious software.
The attacker usually pretends to be a trusted company, bank, or internal department. The message might:
Ask you to “verify” or “update” your account
Direct you to a fake website that looks legitimate
Urge you to open an attachment that secretly contains malware
Once the attacker has your credentials or other personal data, they can steal money, impersonate you online, or move deeper into your employer’s network and cause a data breach.
For anyone working in IT, being able to explain “what is phishing” in plain language and spot phishing attempts in real time is now a core skill.
Why phishing awareness matters in the IT industry
From an IT and cybersecurity perspective, phishing is uniquely dangerous:
It bypasses technical security controls by targeting human behavior.
A single successful phishing attack can compromise multiple systems and accounts.
Phishing emails are cheap to send and easy to automate, so scammers can reach thousands of users at once.
Industry studies consistently show that phishing continues to be a leading cause of data breaches and ransomware incidents. That’s why many compliance frameworks explicitly require ongoing phishing training and awareness programs.
When you understand what is phishing, you can play an active role in defending both your own data and your employer’s environment.
How phishing attacks work
Most phishing attacks follow a similar pattern:
Reconnaissance and targeting
Cybercriminals select an organization or group of individuals as the target.
They gather information from public sources (websites, LinkedIn, social media) or previous data leaks.
Message creation
Attackers design phishing emails or other messages that look legitimate, often copying real branding, logos, and signatures.
They register look‑alike domain names and build fake websites to capture credentials.
Many phishing attacks add urgency, such as “Your payroll account will be locked today.”
Delivery to the victim
The messages are sent via bulk email, SMS, messaging apps, or automated phone calls.
Some attacks come from compromised real accounts, which makes them appear even more trusted.
Exploitation
The victim clicks a URL, opens an attachment, or replies with personal details.
Login pages silently record usernames, passwords, and multi‑factor codes.
Attachments install malware that gives hackers remote access.
Action on Objectives
Stolen data and accounts are used to move through networks, steal additional credentials, or launch further attacks.
Data may be sold or combined with other phishing scams to increase impact.
At every step, attackers use social engineering techniques to make their messages look routine and safe.
Main types of phishing attacks
Phishing isn’t a single technique—it’s a family of related attacks that use similar psychology but different delivery methods.
Email phishing
Classic email phishing is still the most common form:
Phishing emails often claim to be from a bank, shipping company, cloud provider, or HR.
The recipient is urged to click a link or open an attachment.
Links lead to fake websites with spoofed domains such as “security‑paypa1[.]com” instead of “paypal.com.”
Because these messages look routine and are sent in bulk, even a small success rate is profitable for scammers.
Spear phishing and whaling
Spear phishing is highly targeted:
Attackers research a specific individual or small group.
They reference real projects, colleagues, or tools to appear legitimate.
The goal is to compromise higher‑value accounts such as system admins or finance staff.
When the target is an executive or “big fish,” the attack is often called whaling. These phishing attacks can create a severe risk for the entire organization.
Smishing and vishing
Not all phishing happens in your inbox:
Smishing uses fraudulent text messages to lure victims to fake websites or to call a spoofed phone number.
Vishing uses live or automated voice calls. Callers may pretend to be tech support, a government office, or your bank, asking you to share card numbers, reset codes, or other sensitive information.
These social‑engineering attacks rely heavily on real‑time pressure and urgency.
Clone phishing, angler phishing, and domain spoofing
Other notable types include:
Clone phishing – A previous legitimate email is copied, but the link or attachment is replaced with something malicious.
Angler phishing – Scammers use social‑media replies or direct messages to impersonate customer support and gather personal data.
Domain spoofing – Attackers forge a sender address so that phishing emails appear to come from a real organization.
Search engine and website phishing
In search‑engine phishing, scammers build a fake website and try to get it indexed or advertised so users find it when they search for a real brand. The site may:
Collect credentials through fake login forms
Offer “free” software that hides malware
Mimic an online bank or payment portal to grab card numbers
Recognizing common signs of phishing emails
Knowing what is phishing is only useful if you can spot it in time. Watch for these red flags in phishing emails and other messages:
Unexpected contact from a company or organization you don’t normally interact with
Poor spelling and grammar, or a tone that doesn’t match legitimate communications
Generic greetings (“Dear customer”) instead of your name
Attachments or links you weren’t expecting
A sender address that looks odd when you double‑check the full domain
Links that show a different URL when you hover over them
Requests for passwords, credit‑card numbers, or other sensitive information
Strong urgency: “Your account will be closed in 1 hour” or “final warning to avoid serious threats”
When in doubt, assume the message might be part of a phishing attack until you confirm otherwise.
Security measures against phishing emails
Defending against phishing emails requires layered security—technical controls plus informed users.
Technical protections
IT and security teams can:
Use email filters and secure email gateways to block known malicious senders and common phishing attacks.
Implement SPF, DKIM, and DMARC to reduce spoofed sender addresses.
Monitor systems for suspicious logins and signs of malware or credential abuse.
Block known fraudulent websites and URLs with web‑filtering tools.
These measures significantly protect organizations but cannot replace user judgment.
Employee training and reporting culture
Because humans remain the prime target, staff training is essential:
Include phishing awareness in onboarding and regular security refreshers.
Use real‑world examples of phishing scams that have hit your industry.
Run simulated phishing attempts so employees can practice safely.
Provide a simple way to report suspicious messages (for example, a “Report Phish” button).
When people feel supported for reporting, they’re more likely to flag phishing emails quickly instead of ignoring them.
Protecting your accounts from phishing threats
You can’t control every phishing attack, but you can control how exposed your accounts are if one succeeds.
Practical tips for individuals
Use strong, unique passwords for every account, stored in a reputable password manager.
Turn on MFA wherever available—especially for email, cloud services, and bank logins.
Keep operating systems, browsers, and apps updated to reduce malware risk.
Go directly to a website by typing the URL instead of following links in messages.
Review account‑activity logs where available and set alerts for unusual sign‑ins.
Practical tips for organizations
Organizations can strengthen resilience against phishing attacks by:
Documenting clear steps users should follow to report phishing attempts.
Regularly reviewing security logs to detect unusual sign‑in patterns or repeated failed logins.
Limiting user privileges so a compromised account can’t access more than necessary.
Segmenting networks to contain damage if malicious access occurs.
Phishing vs. other cyber threats
Phishing often overlaps with other cyber threats, but it has some distinct characteristics.
Malware – Any malicious software designed to damage or compromise systems. Phishing can deliver malware, but malware can also spread through other channels.
Ransomware – A form of malware that encrypts data and demands payment for decryption. Many ransomware campaigns begin with a simple phishing email.
Social engineering – A broader category of psychological manipulation used by hackers and cybercriminals to get people to do something they shouldn’t. Phishing is one type of social‑engineering attack focused on deceptive communications.
Understanding how these concepts relate helps you explain the bigger picture to non‑technical stakeholders.
What to do if you suspect a phishing attempt
If you receive a message that might be phishing:
Do not click any links or open attachments.
Capture details such as sender address, full URLs, and the time the message was sent.
Report the suspicious email or text messages using your organization’s official process.
If you believe you entered credentials on a fake website, immediately change your password and update any other accounts where you reused it.
Notify your security or IT team so they can investigate and warn others.
Timely reporting can stop a single victim incident from turning into an organization‑wide breach.
Staying ahead of evolving phishing techniques
Phishing continues to evolve. Attackers now use AI to craft more convincing messages at scale, combine multiple attacks (for example, a phone call followed by a confirming email), and exploit new platforms.
To stay prepared:
Follow trustworthy security blogs and advisories.
Encourage a culture where people question anything that seems off—even if it looks legitimate at first glance.
The more familiar you are with what is phishing and how modern phishing attacks operate, the better positioned you are to protect both yourself and your organization.
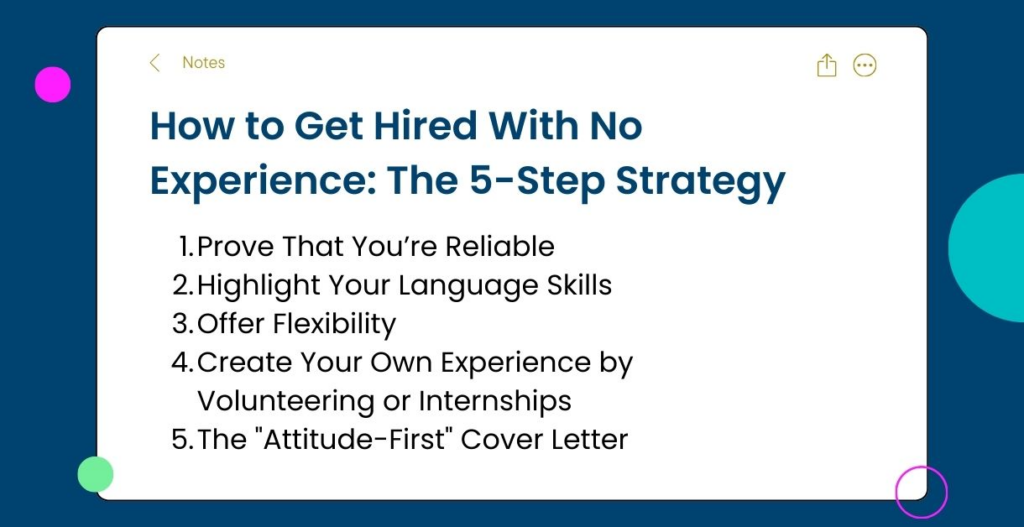
What people actually look for when hiring juniors that stand out.
May 15, 2026
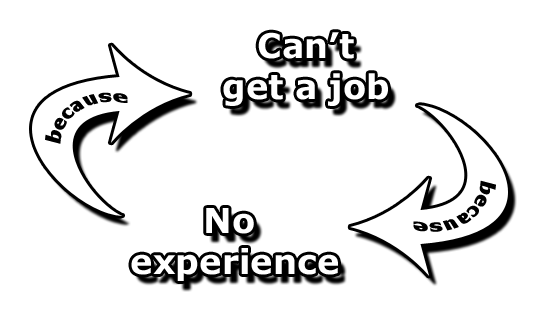
If you’re applying for junior roles right now, you’ve probably noticed something weird: the listings still exist, but HR system and staff are in a deep pit of despair. Applications go into a void and you may notice your friends with current CVs getting little or no response either.
You’re not imagining it. I’ve covered this in a previous blog, when I went through AI’s labor market impact: junior-level roles in AI-exposed occupations are showing a real, statistically significant drop in entry rates for workers aged 22–25. People aren’t getting laid off (although we see many layoffs from big techs, the unemployment rate has remained static for a while), they’re just not getting hired in the first place. To get hire you may have to change your focus and approach these positions from a more aggressive point of view.
* Be the person who is the “care taker”
This is the most underrated skill in the modern employment market. It’s also the one that many people look for when interviewing people for junior roles, especially looking for situations where these people have assumed responsibility when it was not in their job description. I’ve chatted about some of these skills on my training and management blog on Freedom Shaper.
“Taking responsibility for things” sounds vague, but it’s really simple: when you see something needs to be done, you get it done and everyone knows that you will find the resources to get it done (this doesn’t mean that you have the resource, but that you will find the resources needed to complete a task) and follow through to get implement the solution.
If you’ve ever worked in a team, you know exactly the kind of person I am talking about, and managers also know how rare and valuable they are.
The reason this skill is so valuable now is because AI handles the task layer fairly well. What it can’t do is own a thread of work end-to-end across humans, systems, and ambiguity. That’s the gap that’s getting more valuable and if you become known for closing the gaps, you become that person managers and leaders can rely on, making you hireable in a way that doesn’t depend on a job function or designation.
You can practise this skill anywhere: at school, in volunteer work, even at home. Take on more that is expected of you and just work right through it.
* Learn to disagree with caution
People use the cliché of teamwork advice, “be a team player,” far to often and it is too vague. The thing real question during interviews is whether someone can disagree with the interviewer constructively in a short discussion regarding a subject matter discussion.
The interviewer may float an opinion that’s deliberately a bit off, about how to scope a project, an architectural choice, or a process question. They may want to see how candidates think and if they can trade ideas and opinions without becoming defensive. The wrong responses are the obvious ones (just agreeing, or arguing aggressively).
* Volunteer anywhere
Volunteering has always been the best way of networking.
I have always recommended to my students to volunteer or find a work term, then add these to their resume. It helps if they are not even applying for jobs during that time. Helping run things at a non-profit is where many could meet people who later remember them when a leadership or other positions open up at their place of work. Volunteering in spaces tied to the work you want to do is how you expose yourself to luck. At Freedom Shaper or Varciti IT Solutions we often call that a work term, where our staff can find a volunteer position for learners to obtain their work experience, and those that excel during their work term normally get a position at the firm where they are working or at least they would get a recommendation from that company.
The mistake Volunteers normally make is treating this time as a line on their CV. The CV line should be a byproduct, while the actual value is the time you spend around people who do things, and those people remember you. Months later when somebody says “we need to find someone for a specific task”, your name could be on top of the list, especially if you followed the previous advice.
If you’re early in your career, find a student club, an NGO, an open-source project, a meetup group. To be useful in a place where useful people are paying attention.
* Your portfolio now becomes your resume
If you’re a technical person, a personal website and or a GitHub account may help. Anything that lets hiring managers see your what you have achieved matters in a world flooded by AI generated CVs personalization is king.
When HR staff review a junior application, the CV tells them what you claim to be and know, but the portfolio tells them what you are actually capable of. What position is being advertised will depend on where and what and where the HR department is most likely look to view what the applicant is capable as. To hire AI engineers, hiring staff can tell in a short time of looking at someone’s GitHub profile whether they understand what they’re doing, the commit messages, the README quality, the structure of the projects, whether the repos are abandoned shells or actual working things. They are being trained to spot AI generated code too!
Applicants do not need impressive projects (good if the have) for junior positions, they just need real projects tied with something they enjoy doing. Size does not matter, but that passion has been put in does.
For nontechnical: the same applies, just in a slightly different format. A portfolio site with case studies, a few well-written analyses on Medium, a presentation deck from a real project they have run. Anything that lets someone evaluate the work that they have done, not just the claim to be able to.
* Write in the public domain
Most young people think they don’t have anything to offer, until they have some experience and that is a huge mistake. I have personally spoken to prospective students so full of curiosity and energy that I’d happy to employ them on the spot without reading a long-form essay from them.
Looking for work, find a topic you care about and start writing about it publicly. LinkedIn, X, or any other Social platform, your own blog, it doesn’t matter where just somewhere online. The platform matters less than the consistency and quality of the posts. The reason this works is simple: most juniors are invisible to hiring managers until they apply for a position. If you write publicly about your field of expertise or love for six months, you arrive at the interview already half-known. The hiring manager may have read your stuff or even noted you capabilities. This also could have a negative impact, based on the content of the posts, very controversial, running people down, even language could cause a negative outlook. Many people that I have worked with have reported not getting a position because they lack a social profile. To build a useful profile will take a few months, be careful what you post, it never goes away.
The object is to write about what you’re learning or working on, not what you’ve mastered as this is history. It’s a win-win situation, you get noticed or HR managers can refer to the information and get an idea of who they are going to interview, and it also improves the comprehension of topics you are interested in.
* Want a position in the AI field, get fluent at AI. AI can work without you
This could probably be the most practical piece advice.
Junior’s being interviewed for AI positions are now being assessed for one thing. Can they work with any of the AI tools intelligently? In today world, working with AI intelligently is not just a matter of copy and pasting code or paragraphs from AI tools. It means more, does the applicant know when to trust the output, when to push back, when to verify, when to throw it out? Do they treat the AI model like a teammate they’re watching, or like a god of the facts? AI makes mistakes and if questioned or shown their mistakes, they are even sorry.
Juniors who are getting hired right now treat AI as an addon their judgement. The ones who aren’t, treat AI as a substitute for their knowledge and judgement.
Do real work with these tools, frequently, and pay attention to where they help you and where they could harm/fail you.
If you’re a student or a recent grad reading this, don’t be fooled, the market is harder than ever before, many people believe that AI will replace many functions and the anxiety you feel is valid, pretending otherwise would be a huge mistake.
But what gets youngsters hired right now are not the things AI is automating. AI is good at tasks, but it’s not good at owning a thread of work across humans and ambiguity, at disagreeing constructively in a room full of opinions, at noticing what nobody assigned, at being the person colleagues trust. That’s still you.
Humans aren’t task executors. We’re the layer that maps how tasks connect, who needs what, when something is going off the rails, and what’s actually worth doing in the first place. This layer is getting to be more valuable, because there is so much more output flying out that needs someone with judgement to make sense of and prioritise it.
Showing up as the kind of candidate who already looks like they’re capable of taking on and actually doing the work, doors will open miraculously. When you have established yourself as a reliable future professional, your reputation does the work of networking for you, something that no application or resume can perform.
Can I safely remove the AI component from my computer?
If you do not want Copilot on your laptop, nothing bad happens to your operating system, but because Microsoft has transitioned Copilot into a standalone web application, you can safely uninstall or completely disable it without impacting core Windows functions.
1. Uninstall the Copilot App
The easiest way to remove the main application from your laptop is through the native Windows settings:
Open Settings by pressing the Windows Key + I shortcut.
Click on Apps in the sidebar, then select Installed apps.
Type “Copilot” in the search box.
Click the three-dot menu next to Microsoft Copilot and select Uninstall.
Restart your PC to clear any remaining cache.
2. Disable Copilot System-Wide (Windows Pro & Enterprise)
To prevent Windows updates from automatically reinstalling or re-enabling Copilot, block it at the system level using the Group Policy Editor:
Press Windows Key + R, type gpedit.msc, and press Enter.
Navigate to: User Configuration > Administrative Templates > Windows Components > Windows Copilot.
Double-click Turn off Windows Copilot, change the selection to Enabled, and click OK.
Next, navigate to: User Configuration > Administrative Templates > Windows Components > Windows AI.
Double-click Remove Microsoft Copilot App, set it to Enabled, and hit Apply.
3. Disable Copilot in Windows Home (Registry Method)
If your laptop runs Windows Home, you must use the Registry Editor to block it:
Press Windows Key + R, type regedit, and click OK.
Head to the path: HKEY_CURRENT_USER\Software\Policies\Microsoft\Windows.
Right-click the Windows folder, select New > Key, and name it WindowsCopilot.
Right-click your new WindowsCopilot folder, select New > DWORD (32-bit) Value, and name it TurnOffWindowsCopilot.
Double-click TurnOffWindowsCopilot, change the Value data to 1, and click OK.
4. Remove Copilot from Microsoft Edge & Microsoft 365
Copilot is also embedded into individual productivity tools and must be turned off within them:
Microsoft Edge: Open Edge settings, click Sidebar, select Copilot, and toggle the switch to Off.
Microsoft 365 (Word/Excel): Go to File > Options > Copilot and clear the Enable Copilot checkbox.
If you have both Copilot and Microsoft 365 Copilot, the difference between these two apps are listed below:
The core difference is that Microsoft Copilot is a basic, standalone consumer chat app, whereas the Microsoft 365 Copilot app is the renamed “Microsoft Office” master hub that consolidates all your productivity apps (Word, Excel, PowerPoint) and connects to enterprise or personal cloud files.
Feature
Microsoft Copilot
Microsoft 365 Copilot
Primary Function
Standalone AI conversational chat.
Central dashboard for Office apps & files.
Data Source
Information pulled from the public web.
Your secure documents, emails, and chats.
Target Audience
Individual home users (Free/Pro).
Business professionals and students.
App Origins
Originally a web shortcut built into Windows 11.
The actual, rebranded Microsoft 365 (Office) app.
Account Type
Personal Microsoft Accounts.
Corporate Entra ID or M365 accounts.
Microsoft Copilot (The Standalone Chat App)
What it is: A standalone interface built as a conversational AI companion.
What it does: It functions identically to a web browser opening Microsoft Copilot directly. It answers questions, generates images, and references public internet data.
Impact of removal: Safe to delete. Removing it only removes a web app wrapper and does not affect your local documents or other programs.
Microsoft 365 Copilot (The Productivity Hub)
What it is: This is actually your primary Microsoft Office/365 app suite under a new name. Microsoft permanently rebranded the main desktop Office hub app to “Microsoft 365 Copilot” to reflect its AI-first design.
What it does: It acts as your single launchpad to open Word, Excel, PowerPoint, and Outlook. If you have an active organization or school subscription, it acts as a secure work portal that indexes your enterprise data with commercial data protection.
Impact of removal: Do not uninstall this if you rely on Microsoft Office. Deleting this application can remove your central dashboard access to your cloud documents, shared files, and quick-launch shortcuts for the Office suite.
If you want to reduce AI clutter, you can safely uninstall the standalone Microsoft Copilot app. Let me know if you would like step-by-step instructions to turn off the AI components inside the Microsoft 365 app without deleting the whole Office hub.
If you are running Windows Pro, you have full access to the Local Group Policy Editor. This allows you to permanently strip the standalone AI from your operating system, remove its background processes, and shut off the AI capabilities inside your Microsoft 365 Office apps without breaking the apps themselves.
Step 1: Permanently Kill Windows Copilot & Background AI
This removes the standalone Copilot app and stops Windows updates from forcefully reinstalling it:
Press Windows Key + R, type gpedit.msc, and press Enter.
In the left panel, navigate to: User Configuration > Administrative Templates > Windows Components > Windows Copilot.
Double-click Turn off Windows Copilot on the right side, select Enabled, and click OK.
Next, look at the left panel again and navigate to: User Configuration > Administrative Templates > Windows Components > Windows AI.
Double-click Remove Microsoft Copilot App, set it to Enabled, and hit Apply.
Close the window, open your Start menu, click the Power icon, and select Restart.
Step 2: Strip AI Features from Microsoft 365 (Office Apps)
You should keep the “Microsoft 365 Copilot” application because it is your main Office launchpad, but you can block the actual AI tracking and icons inside Word, Excel, and PowerPoint:
Method A: The Global Privacy Switch (Recommended)
Open Microsoft Word or Excel, and click File in the top-left corner.
Click Options at the bottom of the left sidebar.
Select Trust Center > Trust Center Settings > Privacy Options > Privacy Settings.
Scroll down and uncheck the box labeled “Turn on experiences that analyze your content”.
Click OK and restart your Office applications. Note: This instantly deactivates the Copilot LLM data-processing engine for your documents.
Method B: Turn Off the Copilot Buttons Directly
Open any Office app (like Excel) and click File > Options.
Click on the Copilot tab in the left-hand pane.
Uncheck the Enable Copilot checkbox.
Click OK and restart the application to hide the toolbar ribbons.
Step 3: Purge the AI Sidebar from Microsoft Edge
Open Microsoft Edge, click the three dots (…) in the top-right corner, and open Settings.
Click Sidebar in the left menu.
Under App and notification settings, click on Copilot.
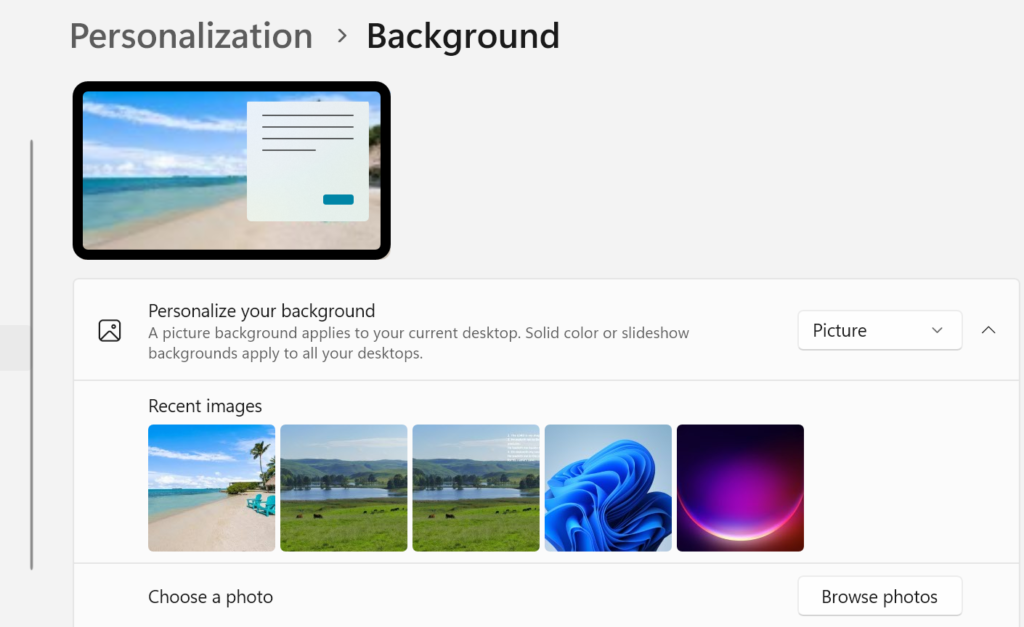
On a Windows 10/11 dual screen, is it possible to have different backgrounds on each screen?
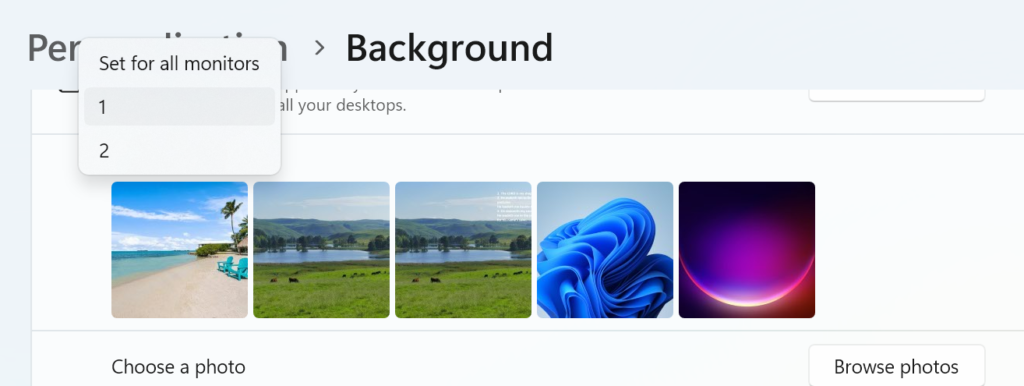
You can have two different backgrounds on an extended dual monitor setup in Windows 10/11. The easiest way is to go to Settings > Personalization > Background, right-click a recent image, and select “Set for monitor 1” or “Set for monitor 2”. Ensure your display is set to “Extend” in settings.
How to Set Different Backgrounds in Windows 10/11
Open Settings: Right-click your desktop and choose Personalize, then click Background.
Ensure Extension: Make sure your displays are set to extend by navigating to System > Display and choosing “Extend these displays”.
Choose Image: In the “Recent images” section, right-click the image you want for a specific monitor.
Assign Monitor: Select Set for desktop 1 or Set for desktop 2.
Alternative (File Explorer): Go to the folder with your images, right-click an image, and select “Set for monitor 1” or “Set for monitor 2”.
Tips for Customization
Identify Monitors: If you are unsure which is monitor 1 or 2, go to Settings > System > Display and click Identify.
Fit Options: Under “Choose a fit for your desktop image,” choose Fill or Span to make images look better, especially if they are different resolutions.
Slideshow: You can set a slideshow, and Windows will treat each monitor independently, allowing them to cycle through different pictures independently
Windows 11 offers several hidden productivity features to help users work more efficiently. ComputerWorld Contributing Editor Preston Gralla offers 8 tips to try out: Focus Sessions to minimize distractions, voice typing, Microsoft Copilot for tasks and settings, an enhanced Clipboard, PowerToys, virtual desktops, Snap Layouts and a secret Start menu for quick access to tools.
Most people spend a lot of time over the years gathering productivity tips for your favorite applications — after all, that’s where you get most of your work done. If you’re like most people, though, you’ve managed to find your way around Windows 11 but figured there’s not much you can do to improve your productivity in the OS itself.
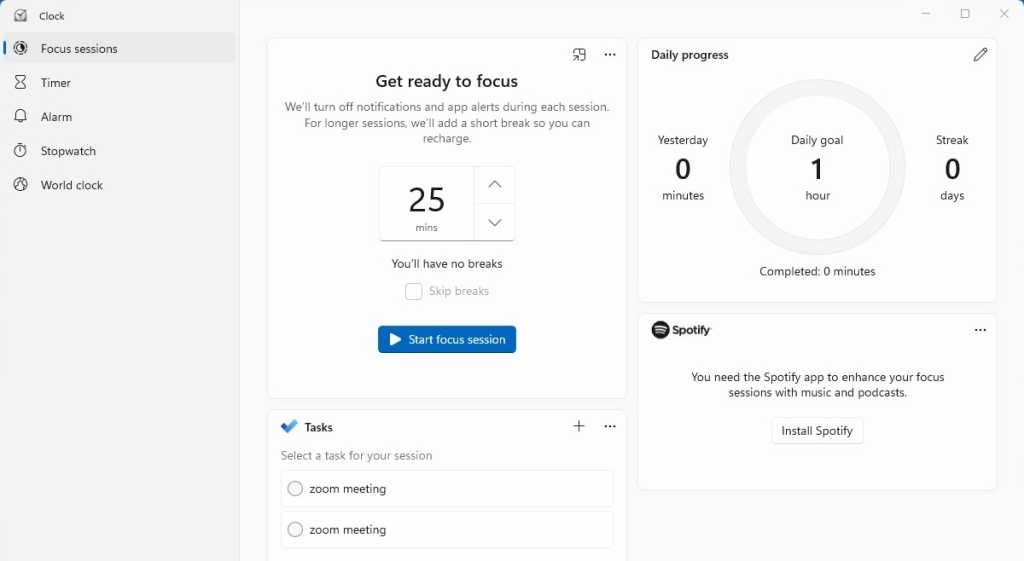
1. Get focused with focus sessions
The biggest productivity-sapper for office workers is one that has been drastically worsened by technology: Many of us are unable to focus on one task at a time, constantly bedeviled by the distractions that are always at hand when you work on a computer. If you find yourself unable to focus on a single task on your PC, join the club. We’re all prone to it.
Windows 11’s Focus sessions feature can help. It enables Windows 11’s Do Not Disturb mode, which turns off all Windows notifications. In addition, apps in the taskbar won’t flash at you if they require a response. Badge notifications on apps in the taskbar are turned off as well.
A focus session uses Windows Clock to let you set a time limit for the session. That way, you won’t be distracted by worrying about how long you want the do-not-disturb session to last. And if background music helps you work, you can also have Spotify play music you specify for the length of the session.
To use Focus sessions:
Run the Windows 11 Clock app. The simplest way is to type clock in the Search box and then click the Clock app that appears.
Click Focus sessions. If it’s the first time you’re using it, click Get started.
The Focus session page appears. In the “Get ready to focus” area, select how long you want the session to last. If you choose less than 30 minutes, the session won’t have a break. If you choose 30 minutes or longer, you’ll be given short breaks. If you don’t want breaks, check the Skip breaks checkbox.
Here’s command central for setting up a focus session.
If you want to use Microsoft To Do and choose tasks from your to do list, make sure you’re signed into your Microsoft account, right-click the three-dot menu in the Tasks area, and click Open in To Do. You’ll be connected to your tasks list.
If you want to play music during your focus session, click Link your Spotify and follow the instructions for linking to your Spotify account and playing music. (If you don’t have Spotify installed, click “Install Spotify” first.)
When you’re done, click Start focus session and get to work. If you want to set a daily goal for how long to use focus sessions, pencil icon in the “Daily progress” area. From now on, whenever you start a Focus session, you’ll see how often you’ve met your daily goal.
2. Type with your voice
How fast a typist are you? No matter how fast you are, it’s unlikely you can type at the speed of thought — or at the speed of speech. And the faster you type, the more mistakes you’re going to make.
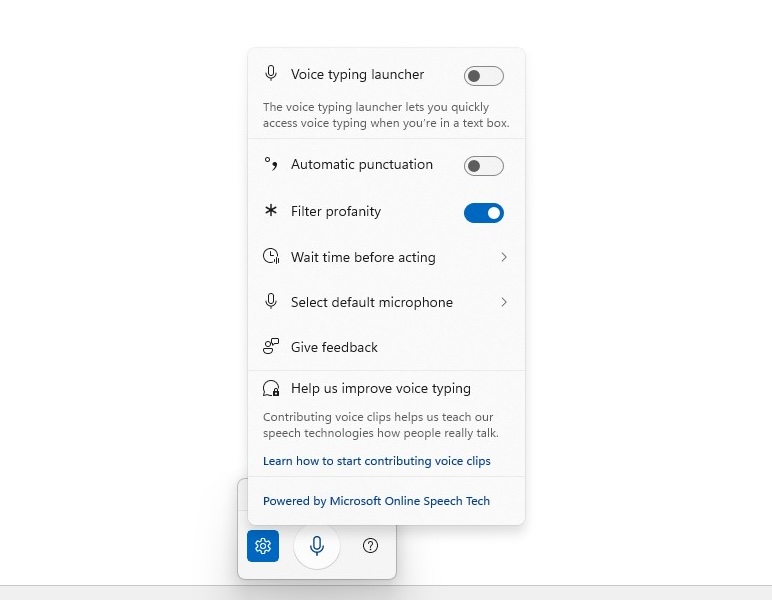
A great way to get more productive at the keyboard is to have your computer do your typing for you by using Windows 11’s voice typing feature. Hold down the Windows key + H to summon Windows’ built-in voice typist. Click the microphone icon that appears and start talking. Note that the first time you use it, Windows will install speech-recognition software to improve its performance.
You’ll be surprised at how fast and accurate it is if you speak in a clear voice. However, there are a few things to keep in mind when using it. One is that there’s sometimes a lag between your speech and when your words are typed in. So if you don’t see the words instantly onscreen, don’t repeat yourself — if you do, your words will be typed twice.
Also, if you try to make edits to the text during the session, by doing things such as deleting text or inserting paragraphs, the session will automatically end. You’ll have to turn voice typing back on.
It also won’t automatically use punctuation. It won’t put a period at the end of a sentence, or commas in the middle of sentences. There’s a way to have it type punctuation, however. Click the settings icon to the left of the microphone and move the slider to on in the “Automatic punctuation” section. You can then say “period” to voice-type a period; “comma” to voice type a comma, and so on.
If you want to use voice typing in text boxes within Windows (such as inside a dialog box), turn on the slider toggle next to “Voice typing launcher.”
Here’s how to customize Windows 11 speech recognition.
3. Use Copilot to speed up both creative and Windows interface tasks
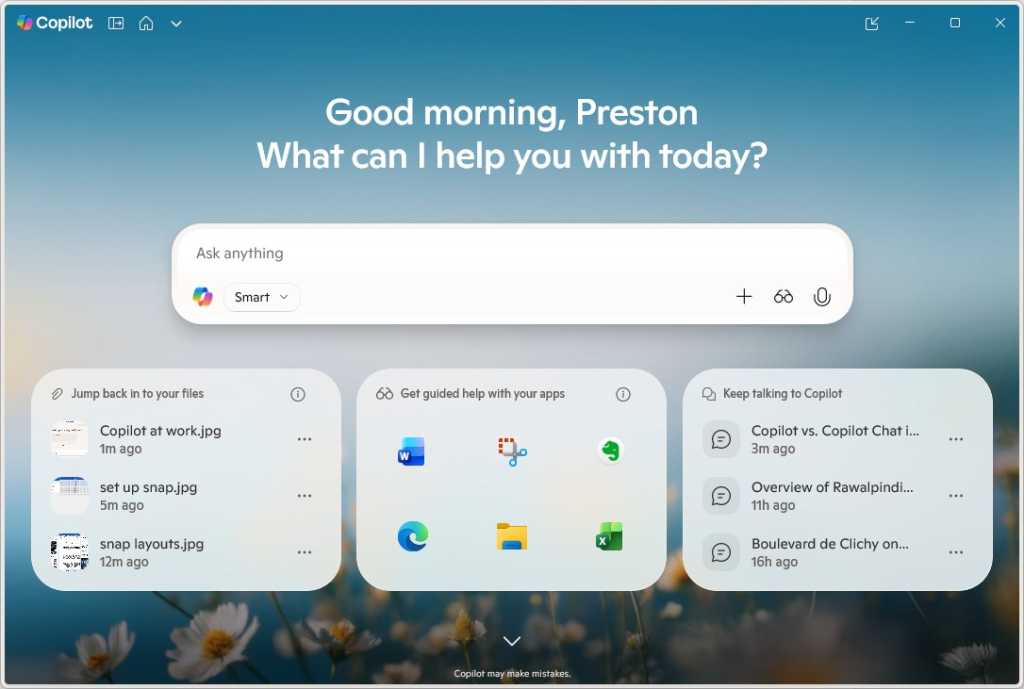
Microsoft’s generative AI tool, Copilot, is front and center in Windows 11 — its icon is right in the middle of the taskbar. Copilot is available in many forms in various Microsoft products, and the heart of it is a chatbot that can perform a wide variety of tasks, such as answering questions, drafting documents, analyzing data, and so on.
In addition to integrating with Microsoft 365 apps like Word, Outlook, and Excel (which requires a paid subscription), Copilot is available for free in a built-in Windows app. You can use it to help with research, write first drafts, create images, and more. Simply click the Copilot icon in the taskbar and type in your question or prompt. You can also type follow-up prompts for more information.
Click the Copiloticon on the taskbar and here’s what you get.
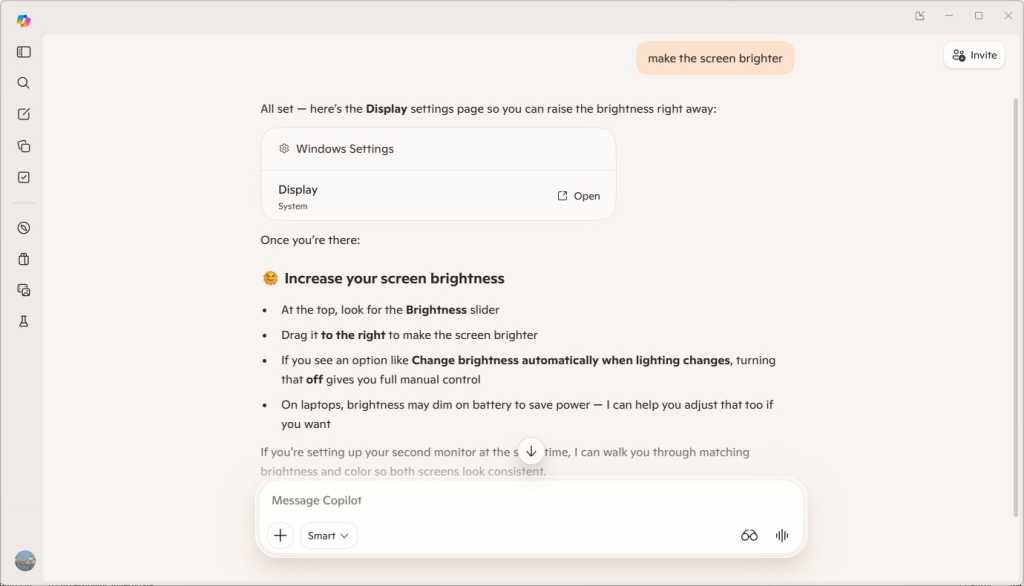
In addition, Copilot can help you quickly do a wide range of tasks in Windows itself, such as making your screen brighter, improving your laptop’s battery life, customizing Bluetooth, stopping apps from starting automatically at startup, and much more. Instead of hunting around in the Quick Settings pane, the Settings app, the Control Panel, and elsewhere in Windows, you just type a prompt telling Copilot what you want to do.
It helps with that in two ways. First, it offers advice, including step-by-step instructions, on how to accomplish something you want to do in Windows 11. Second, it will link directly to the exact Settings page you want to use or customize. Note that it won’t actually send you to the page on its own. Instead, it creates what it calls a “clickable card” with the name of the setting you want to use. Click Open on the card and you’ll be sent straight to the setting. You can then change the setting in the way that Copilot advised.
Copilot can help you quickly get to the right Windows 11 system setting with a click.
Note that Microsoft is constantly improving what Copilot can do, so if it doesn’t provide a helpful response when you ask it for help with a Windows task, you might want to try again at a later date.
4. Copy and paste like a pro
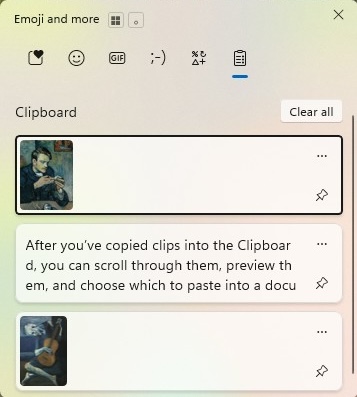
For decades, the Windows Clipboard had been brain-dead. You copied something into it, pasted that clip into an application, and that was that. The next time you copied a clip into it, the old one disappeared.
Not these days, though. Microsoft has smartened it up. Now it stores multiple clips and lets you preview those clips and choose which one you’d like to paste into a document. You can also store clips permanently, a great way to keep boilerplate text around that you can paste into documents or emails, or store a graphic of your signature to help digitally sign documents.
You can even sync your Clipboard history across multiple Windows devices: Go to Settings > System > Clipboard. In the “Clipboard history” section, make sure the slider is on. In the “Sync across devices” section, turn the slider from off to on.
Copy items to the Clipboard in all the myriad ways you’re used to, such as pressing Ctrl + C, right-clicking an image on the web and selecting Copy image from the menu that appears, and so on. You can keep on copying items, and the Clipboard will keep saving them as individual clips. There’s no hard limit on the number of clips you can save and how large each clip can be — it’s based on how much memory you have and the amount of total data in all your saved clips.
After you’ve copied clips into the Clipboard, you can scroll through them, preview them, and choose which to paste into a document. To see them, press Windows key + V. A small window appears with the clips you’ve pasted to the Clipboard. Scroll through, and when you find the clip you want to paste, click it. If you only want to paste your most recent clip into a document, just press Ctrl + V.
The powered-up Windows Clipboard.
If you’ve chosen to sync the clips, they’ll be available on the Clipboard of all other Windows 11 or 10 devices you choose to sync.
The Clipboard has a few other tricks up its sleeve, with icons across its top for pasting emoji, kaomoji, popular GIFs from the internet, and symbols.
Your clips are deleted when you turn off your PC. But you can save some permanently. Press Windows key + V to launch the Clipboard, click the three-dot icon at the top right of any clip, and select Pin. That pins the clip to the Clipboard permanently until you unpin it.
You can also manually clean out your Clipboard by deleting individual clips or by deleting them all at once. To delete an individual clip, click the three-dot icon at its top right and select Delete. To delete all the clips in the Clipboard, click the three-dot icon at the top right of any clip and select Clear all. Pinned clips won’t be deleted unless you delete them individually.
5. Power up Windows 11 with PowerToys
Longtime Windows tinkerers and productivity-seekers will likely remember Windows PowerToys, first released for Windows 95 several years before the turn of the century. PowerToys were small, free utilities from Microsoft that let you tweak, customize, and power up Windows in countless ways. Used incorrectly, they could waste many non-productive but pleasant hours tinkering away. Used correctly, they could be a great Windows productivity booster, mainly for small tasks that can take up large chunks of your time.
After updating PowerToys for Windows XP, Microsoft unaccountably abandoned them in Windows Vista, Windows 7, and Windows 8/8.1. It wasn’t until September 2019, four years after the release of Windows 10, that they were updated for Windows 10, and then for Windows 11 when it was released.
These days it’s hard to know whether to refer to PowerToys as singular or plural; in its current incarnation, PowerToys is a single app that contains many handy mini tools. The PowerToys app doesn’t come installed in Windows 11; you instead download it for free. As I write this, PowerToys includes more than two dozen tools, and Microsoft regularly adds new ones.
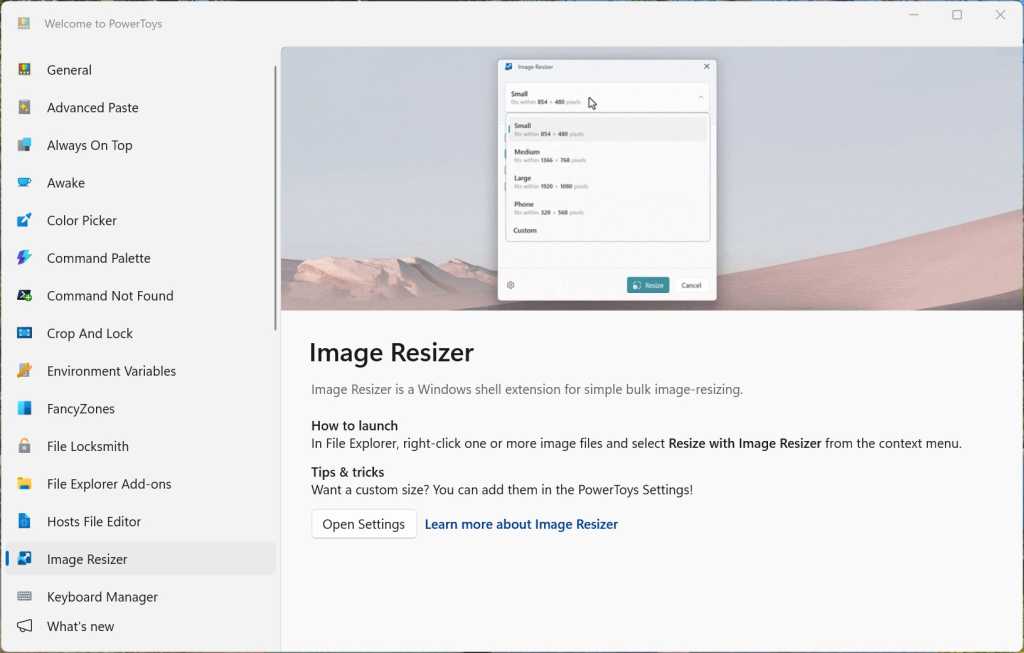
Microsoft’s free PowerToys app offers more than two dozen productivity boosters, including one for doing bulk resizing of images.
There isn’t room in this article to delve into every tool, but it’s worth trying several out to see if they’re useful for you. Here are my favorite five:
Image Resizer: Need to resize multiple photos or images in the same way in one fell swoop? With this utility, just select the images, choose how you want them resized, and click.
Always on Top: Are you driven crazy when you’re using a productivity app like Word and Excel, you temporarily move your focus to another window, and the app gets hidden? No more. Always on Top keeps your productivity app in front, even when you switch focus.
Keyboard Manager: Keyboard shortcuts are among the greatest productivity boosters for getting things done quickly. If there’s not enough of them for you in Windows 11, this tool lets you remap your keyboard and create keyboard shortcuts.
Light Switch: This lets you switch between Windows’ light and dark modes according to a schedule you set or synced to sunrise and sunset times in your area.
Mouse Utilities: Master your mouse with these utilities — you’ll be able to do things like shake your mouse to focus its pointer, draw crosshairs centered around the pointer, make the pointer jump to anywhere on your screen, and more.
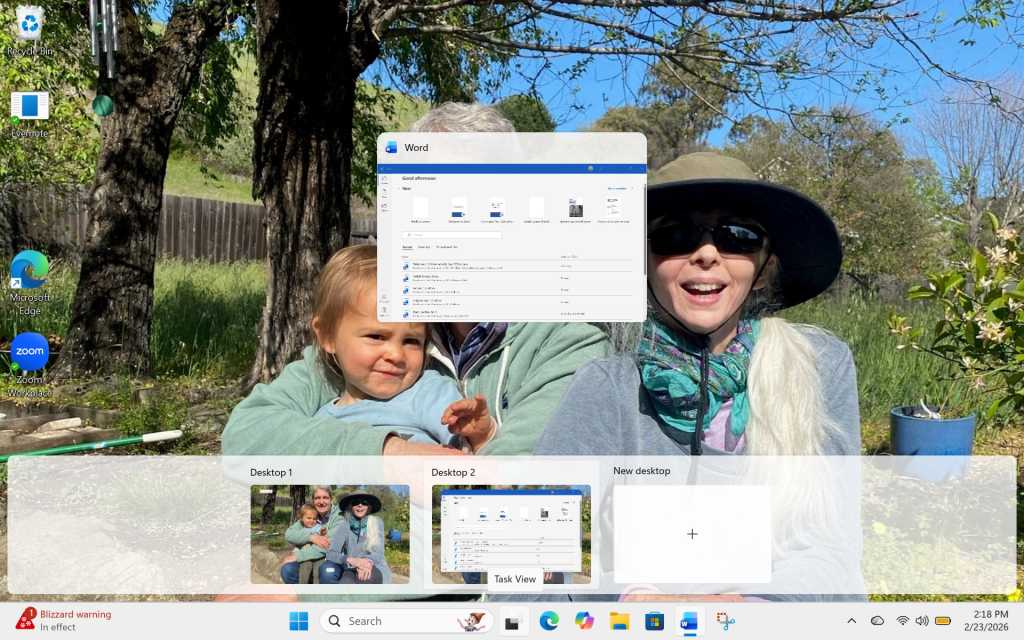
You use your PC for many different purposes. You might, for example, use one set of apps for creating presentations, another for making videos, and another when researching and writing. Or you may have a set of apps you typically use when working at the office and a somewhat different set when working remotely. And, let’s face it, occasionally you might even want to do something non-work-related on your PC. So you may waste time hunting for the right apps for each situation.
Virtual desktops make it easier to use your PC for different purposes. You can create multiple desktops with different apps running on each one for different reasons, such as one for working at home, one for working at the office, another for gaming, etc.
Creating virtual desktops in Windows 11.
It’s simple to do. Click the overlapping windows icon to the right of the search box on the taskbar. If you haven’t created any virtual desktops yet, the top part of your screen will show all the open windows on your desktop, and the bottom of the screen will display “Desktop 1” (which is your existing desktop) and “New Desktop” with a + sign under it. To create a new desktop, click the + sign. A new desktop appears, titled “Desktop 2.” Click it to make it your active desktop, and set it up however you want.
You can keep making new desktops this way. To switch among them, click the overlapping windows icon and select the one you want to use. You can set up each desktop any way you want — for example, by putting all the icons for in-office related apps within easy reach in one, and all the icons for working at home in another.
To make it easier to differentiate between them, you can rename each desktop. Simply click its name (Desktop 1, for example) and type in the new name you want.
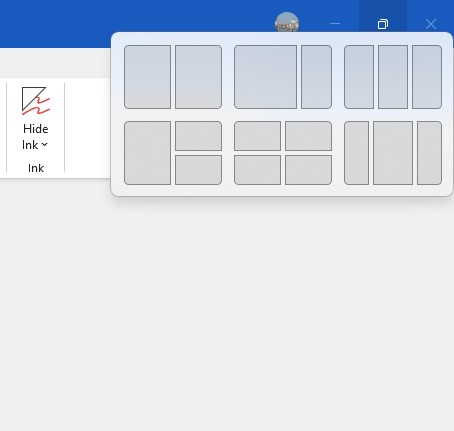
7. Organize your apps with Snap Layouts
There’s another way to keep all apps related to a task in one place — by using Windows 11’s Snap Layouts feature. With it, you can group your open windows into one of a half-dozen pre-built screen layouts. You can have two apps side by side, each taking up half the screen, for example. Or you might have one app on the left and two stacked vertically on the right, or four apps in a grid.
Snap Layouts in action.
To use Snap Layouts, first open the applications you want to be in a layout. Then hover your mouse over an application’s maximize icon on the upper right of the window, between the minimize and close icons. A panel appears with layout options. Choose the layout you want and which position you want the application to be in, and the app window snaps into that position.
Choosing a layout.
When you do that, all your other open apps will display inside a new window. Click any of those apps to fill in spots in the rest of the layout. The grouping is saved as a Snap Group that you can to return to if you’ve opened other apps or minimized any of the group’s app windows. To return to the group, hover your mouse over the taskbar icon of any of the applications in a Snap Group. You’ll see thumbnails of all the apps in the group. Click the thumbnail to return to the group.
For more details about Snap Layouts and related features, see “Make multitasking a Snap on your Windows PC.”
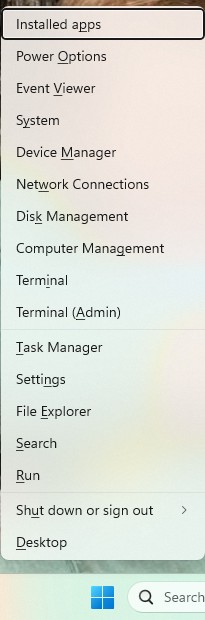
8. Use the secret Start menu
Hidden in the bowels of Windows 11 are many powerful tools that can make you more productive, such as Network Connections for viewing and managing your internet connections; Device Manager for managing your devices; Terminal, an interface for powerful command-line tools, especially for IT pros; Task Manager for helping make your PC more efficient; and many others.
That’s all well and good, but unless you use them all the time, it’s easy to forget that they exist. And even if you do remember they exist, it’s often not easy to find them. Some are buried deep in the Settings app. Others require that you launch them from a command line. And yet others may be squirrelled away in a place you’ll never find.
There’s a trick for getting to them quickly — use what some people call the secret Start menu. To launch it, right-click the Start icon to the left of the search box on the taskbar, or press the Windows key + X. A menu appears with a long list of these tools. Click whatever tool you want to use and get going with it.
Here’s what some people call the “secret Start menu” for getting quick access to productivity-boosters.
Saving a SharePoint site as a template in Microsoft 365 allows you to reuse site structures, settings, lists, libraries, and content across your organization, ensuring consistency and saving time. However, this feature is not enabled by default, especially for modern sites, and requires administrator permissions and configuration changes to unlock. The process varies slightly depending on whether you’re working with classic, communication, or modern team sites.
Prerequisites
You must have Global Administrator or SharePoint Administrator privileges.
Custom scripting must be enabled on the site collection (this may take up to 24 hours to take effect unless PowerShell is used).
For modern team sites with Microsoft 365 groups, use PowerShell instead of the classic UI method.
Ensure you’re using SharePoint Online Management Shell or PnP PowerShell for script-based approaches.
Step-by-step instructions
Method 1: Using the Classic UI (Classic and Communication Sites)
Enable custom script in the SharePoint Admin Center:
Go to SharePoint Admin Center.
Click on Settings > Custom Script.
Enable both:
Allow users to run custom script on personal sites
Allow users to run custom script on self-service created sites
Click OK (note: changes may take up to 24 hours).
Navigate to your target site (e.g., https://yourdomain.sharepoint.com/sites/yoursite).
Append the following to the URL and press Enter:/_layouts/15/savetmpl.aspxThis will open the “Save Site as Template” page.
Fill in the required fields:
File Name: A unique name for the .wsp template file.
Template Name: Display name for the template.
Description: Optional description.
Include Content: Check this box if you want to include existing lists, libraries, and data.
Click OK to save.
The template is now stored in the Solution Gallery of the site collection and can be used when creating new subsites under the Custom tab.
⚠️ If the “Save Site as Template” option doesn’t appear, use PowerShell to enable scripting immediately (see below).
Method 2: Using PowerShell (All Site Types, Recommended for Modern Team Sites)
Install SharePoint Online Management Shell (if not already installed).
Open PowerShell as administrator and run:# Connect to SharePoint Admin Center Connect-SPOService -Url https://<your-tenant>-admin.sharepoint.com
Enable custom scripting on the target site (bypass 24-hour delay):Set-SPOSite -Identity https://<your-tenant>.sharepoint.com/sites/yoursite -DenyAddAndCustomizePages $False
For modern team or communication sites, use Get-SPOSiteScriptFromWeb to capture the site structure:$SiteURL = "https://<your-tenant>.sharepoint.com/sites/yoursite" # Extract site schema including branding, pages, and settings $SiteSchema = Get-SPOSiteScriptFromWeb -WebUrl $SiteURL -IncludeBranding -IncludeTheme -IncludeRegionalSettings -IncludeSiteExternalSharingCapability -IncludedLists "SitePages" # Save as a reusable site script $SiteScript = Add-SPOSiteScript -Title "My Site Template" -Description "Template from existing site" -Content $SiteSchema # Create a site design based on the script Add-SPOSiteDesign -Title "My Site Design" -WebTemplate 64 -SiteScripts $SiteScript.Id -Description "Reusable team site design"
The new site design will appear in the Templates section when creating new sites and can be applied organization-wide.
✅ Use this method for modern sites where the classic template option is unavailable.
On Nov. 6 Global Knowledge welcomes cybersecurity authorities from CompTIA, EC-Council and CQURE to a webinar on critical missteps that lead to breaches and proactive strategies to lower risk in the future. Speakers will break down what really happened in major cyber incidents and what every team can learn about prevention, response and resilience.
The Office of the National Cyber Director has begun developing a new strategy to address threats from China and other adversaries. The strategy will involve collaborating with the private sector, focusing on harmonizing regulations and setting minimum cybersecurity standards, said Director Sean Cairncross who has cited the need for a clear message to deter attacks. Full Story: Federal News Network/WFED-AM (Washington, D.C.) (10/31)
This new strategy may eventually be adopted on a Global scale, as we follow the goings on around the World.
Microsoft Word now autosaves new documents to the cloud
Microsoft is updating Word for Windows to automatically save new documents to the cloud, eliminating the need for users to enable AutoSave manually. While users can set default cloud locations or disable the feature, some have expressed frustration over the added steps to save files locally. Full Story: PCWorld (8/28)
In my opinion this is a really sad state of affairs, not giving people a choice, is an infringement of our rights.