Rename User Profile Folder

Rename User Profile Folder in Windows 11

If your computer becomes disjointed from a Domain, and you need to rejoin it to the domain, it will create a new profile folder with additional information in the folder name. Here is a way to change the folder name back to the original.

To rename the user profile folder in Windows 11, you’ll need to follow these steps:

  1. Create a new administrator account: This will allow you to modify the registry and rename the user profile folder without affecting your current account.
  2. Activate the built-in administrator account: Go to Computer Management > Local Users and Groups > Users > Activate built-in admin.
  3. Sign out and log in to the new administrator account: This will ensure you’re using the correct account for the renaming process.
  4. Rename the user profile folder: Go to the C:\Users\ folder and rename the subfolder with the original user name to the desired new name. Make sure to follow these guidelines:
    • No spaces within the new name.
    • Use only alphanumeric characters (letters and numbers).
  5. Update the registry: Go to HKEY_LOCAL_MACHINE\SOFTWARE\Microsoft\Windows NT\CurrentVersion\ProfileList and update the registry entries associated with your user account to reflect the new folder name.
  6. Restart and log in to your original account: After updating the registry, restart your computer and log in to your original account. The renamed user profile folder should now be reflected.

Important Notes:

  • Renaming the user profile folder can cause issues with some Microsoft Store apps. Signing out and signing back in may resolve these issues.
  • If you encounter problems, consider creating a new local account (without spaces in the name) and moving your files from the old account to the new one. This may be a safer and more straightforward approach.
  • The workaround mentioned in KB article 2454362 (applicable to Windows 7 and Server 2008 R2) is not applicable to Windows 11.

Additional Tips:

  • Be cautious when modifying the registry, as incorrect changes can cause system instability.
  • It’s recommended to create a system restore point before making changes to the registry or user profile folder.
  • If you’re experiencing issues with the renamed user profile folder, try resetting the folder name to its original value and then renaming it again.

By following these steps and guidelines, you should be able to successfully rename your user profile folder in Windows 11.

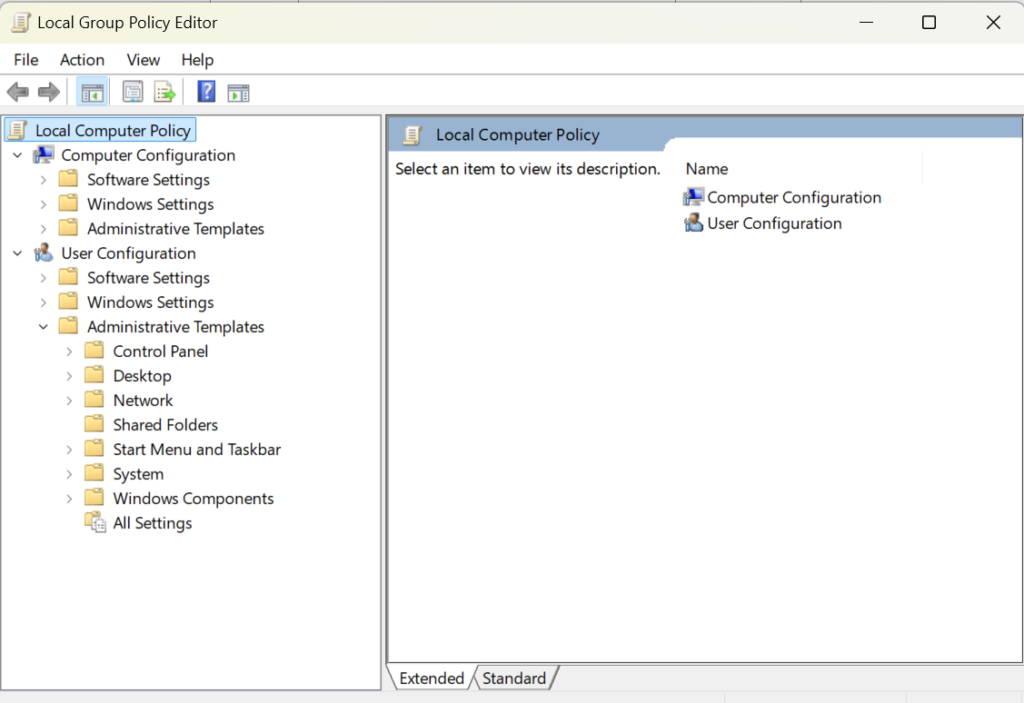
Group Policy Editor

Regional Date Format: Setting Does Not Save

Trying to change the default Regional Settings through the Domain Group Policy Editor to apply a date format of dd-mm-yyyy instead of the default m/d/yyyy

Creating a new GPO called “RegionalSettings” and editing this GPO and saving it. Re-editing the GPO settings, we notice that they have not saved the new format but reverted back to the default.

Trying this on other policies, including the default domain controller policy, all to no avail. No changes are saved.

When changes are made we now see a red box around what was changed, in the past we would click on the apply button, but this no longer saves the changes.

Not sure at what stage this was changed, but now it seems that when changes are made we have to press (F5) before exiting out of the properties page by clicking OK.

Turn Off Windows Copilot

Remove Copilot using GPEdit snappin.

Remove Copilot using the Group Policy Editor, you will need to have Windows 11 Pro, Enterprise, or Education editions. The Group Policy Editor is a tool that allows you to configure various policies and settings for your computer and user accounts. To access the Group Policy Editor, type gpedit.msc in the Start menu or the Run command and hit Enter. Then, navigate to the following folder using the left panel:

  • User Configuration > Administrative Templates > Windows Components > Windows Copilot.
  • On the right-side pane, double-click on the policy ‘Turn off Windows Copilot’ and select ‘Enabled’. Then, click ‘Apply’ and ‘OK’.
  • This will disable Copilot entirely and remove it from the Settings app as well.

Brother HL-4040

I have an older Brother HL-4040CDN that is showing a Print Unable 32 error

I found this video on the tube about the repair process

Windows Disk Management

Windows 10 Disk Management via Prompt

There are several ways to open Disk Management from the Command Prompt in Windows 10:

There are two primary tools available to manage disks on a Windows computer.

  • Disk Management Console (a graphical interface using the Microsoft Management Console framework .msc)
    • There are many ways of accessing this tool
  • DiskPart, a command line tool
    • Doth should be opened with administrative privileges.

Using the diskmgmt.msc command:

  • Open the Command Prompt as an administrator (right-click the Start button and select “Run as administrator” or search for “Command Prompt” in the Start menu and right-click it to select “Run as administrator”).
  • Type diskmgmt.msc and press Enter.
  1. Using the diskpart command:
    • Open the Command Prompt as an administrator (as described above).
    • Type diskpart and press Enter to launch the DiskPart utility.
    • At the DISKPART> prompt, type list disk to display all disks, then select the disk you want to manage using the select disk <disk_number> command.

Additional Tips

  • Make sure you’re logged in as an administrator before opening Disk Management or DiskPart from the Command Prompt.
  • You can also use the powershell command to open Disk Management: powershell -Command "Start-Process -FilePath 'diskmgmt.msc' -Verb RunAs".
  • If you need to perform multiple operations, consider creating a text file script with DiskPart commands and running it from the Command Prompt.

Common DiskPart Commands

  • help or ?: Displays all commands available.
  • <command> ? (or help) displays options available for the command
  • list disk: Displays a list of all disks on the system.
  • select disk <disk_number>: Selects the specified disk for management.
  • list volume: Displays a list of all volumes on the selected disk.
  • select volume <volume_number>: Selects the specified volume for management.
  • format <volume>: Formats the selected volume.
  • delete volume <volume_number>: Deletes the specified volume.

There is a huge difference between “Disk Management” and DiskPart: There are many more options available in DiskPart, it is however a tool where knowledge of what is required and what commands are available is required.

Remember to use caution when using DiskPart commands, as they can modify your disk configuration permanently. Always make sure to back up your data before making significant changes.

Teams update

Microsoft Teams new chat and channels AMA (Ask Microsoft Anything)

Streamlined to help you collaborate more effectively

Stay on top of what matters
Bring your chat, teams, and channels into one place. Catch up without switching contexts, integrating both chat and channels into your critical workflows.

Triage efficiently
Filter to unread messages to catch up on conversations across chat and channels or use the new @mention view to access messages directed at you in one interactive list.

Organize your way
A new Favorites section contains your prioritized chat and channels. Create custom sections to organize conversations by projects and topics.

Customize your experience
Choose whether you want chat and channels combined or separate, how to sort conversations, and more. You can optimize with different settings on desktop and mobile.

More Shortcuts

Taskbar Keyboard shortcuts

The below shortcuts allow you to navigate to the taskbar options quickly. 

  • Ctrl + Shift + click a taskbar button  –  Open an app as an administrator.
  • Ctrl + click a grouped taskbar button  –  Cycle through the windows of the group
  • Shift + click a taskbar button  –  Open an app or quickly open another instance of an app.
  • Shift + right-click a grouped taskbar button  –  Show the window menu for the group.
  • Shift + right-click a taskbar button  –  Show the window menu for the app.
Dialog box shortcuts

The following list of shortcuts helps you perform an action within the dialog box.

  • Alt + underlined letter  –  Perform the command (or select the option) that is used with that letter.
  • Arrow keys  –  Select a button if the active option is a group of option buttons.
  • Backspace  –  Open a folder one level up if a folder is selected in the Save As or Open dialog box.
  • Ctrl + 1, 2, 3,…  –  Move to that tab number.
  • Ctrl + Shift + Tab  –  Move back through tabs.
  • Ctrl + Tab  –  Move forward through tabs.
  • F4  –  Display the items in the active list.
  • Shift + Tab  –  Move back through options.
  • Spacebar  –  Select or clear the check box if the active option is a check box.
  • Tab  –  Move forward through options.
Copy, paste and other general keyboard shortcuts
  • Alt + A  –   Set focus to the first icon in the Suggested actions menu.
  • Alt + Shift + arrow keys  –  When a group or tile is in focus on the Start menu, move it in the direction specified.
  • Ctrl + A  –  Select all items in a document or window.
  • Ctrl + arrow keys  –  Resize the Start menu when it’s open.
  • Ctrl + C (or) Ctrl + Insert  –  Copy the selected item.
  • Ctrl + D (or) Delete  –  Delete the selected item and move it to the Recycle Bin.
  • Ctrl + E  –  Open Search (in most apps).
  • Ctrl + Esc  –  Open Start.
  • Ctrl + F4  –  Close the active document (in apps that are full-screen and let you have multiple documents open at the same time).
  • Ctrl + Shift + arrow keys  –  When a tile is in focus on the Start menu, move it into another tile to create a folder.
  • Ctrl + Shift + V  –  Paste as plain text
  • Ctrl + Shift with an arrow key  –  Select a block of text.
  • Ctrl + Shift  –  Switch the keyboard layout when multiple keyboard layouts are available.
  • Ctrl + Up arrow  –  Move the cursor to the beginning of the previous paragraph.
  • Ctrl + V (or) Shift + Insert  –  Paste the selected item.
  • Ctrl + X  –  Cut the selected item.
  • Ctrl + Y  –  Redo an action.
  • Ctrl + Z  –  Undo an action.
  • Esc  –  Stop or leave the current task.
  • F2  –  Rename the selected item.
  • F3  –  Search for a file or folder in File Explorer.
  • F4  –  Display the address bar list in File Explorer.
  • F5  –  Refresh the active window.
  • F6  –  Cycle through screen elements in a window or on the desktop.
  • F10  –  Activate the Menu bar in the active app.
  • Left arrow  –  Open the next menu to the left, or close a submenu.
  • Right arrow  –  Open the next menu to the right, or open a submenu.
  • Shift + Delete  –  Delete the selected item without moving it to the Recycle Bin first.
  • Shift with any arrow key  –  Select more than one item in a window or on the desktop, or select text in a document.
  • PrtScn  –  Take a screenshot of your whole screen and copy it to the clipboard.

Text editing shortcuts

Use the following list of shortcuts to edit the text more quickly and efficiently.

  • Backspace  –  Delete characters to the left
  • Ctrl + =  –  Make selected text subscript
  • Ctrl + A  –  Select all text
  • Ctrl + B  –  Make selected text bold
  • Ctrl + Backspace  –  Delete words to the left
  • Ctrl + C  –  Copy text
  • Ctrl + Del  –  Delete words to the right
  • Ctrl + Down Arrow  –  Go to end of line break
  • Ctrl + End  –  Go to the end of the document
  • Ctrl + F  –  Find text
  • Ctrl + H  –  Find and replace text
  • Ctrl + Home  –  Go to the beginning of the document
  • Ctrl + I  –  Make selected text italic
  • Ctrl + Left Arrow  –  Go to beginning of previous word
  • Ctrl + Right Arrow  –  Go to beginning of next word
  • Ctrl + Shift + =  –  Make selected text superscript
  • Ctrl + U  –  Underline selected text
  • Ctrl + Up Arrow  –  Go to beginning of line break
  • Ctrl + V  –  Paste text
  • Ctrl + X  –  Cut text
  • Ctrl + Y  –  Redo text
  • Ctrl + Z  –  Undo text
  • Delete  –  Delete characters to the right
  • Down Arrow  –  Go down one row
  • End  –  Go to the end of the current line
  • Home  –  Go to the beginning of the current line
  • Left Arrow  –  Go to the left or to the end of previous line break
  • Page Down  –  Move down one frame
  • Page Up  –  Move up one frame
  • Right Arrow  –  Go to the right or to the beginning of next line break
  • Shift + Ctrl + Down  –  Select paragraphs to the right
  • Shift + Ctrl + End  –  Select text between the cursor and the end of the document
  • Shift + Ctrl + Home  –  Select text between the cursor and the beginning of the document
  • Shift + Ctrl + Left  –  Select words to the left
  • Shift + Ctrl + Right  –  Select words to the right
  • Shift + Ctrl + Up  –  Select paragraphs to the left
  • Shift + Down Arrow  –  Select lines downwards
  • Shift + End  –  Select text between the cursor and the end of the current line
  • Shift + Home  –  Select text between the cursor and the beginning of the current line
  • Shift + Left Arrow  –  Select characters to the left
  • Shift + Page Down  –  Select one frame at a time of text below the cursor
  • Shift + Page Up  –  Select one frame at a time of text above the cursor
  • Shift + Right Arrow  –  Select characters to the right
  • Shift + Tab  –  Outdent
  • Shift + Up Arrow  –  Select lines upwards
  • Tab  –  Indent
  • Up Arrow  –  Go up one row

Command prompt shortcuts

Use the following keyboard shortcuts to work more efficiently.

  • Ctrl + A  –  Select all content of the current line.
  • Ctrl + C (or Ctrl + Insert)  –  Copy selected items to clipboard.
  • Ctrl + Down arrow key  –  Move screen down one line.
  • Ctrl + End  –  Scroll to the bottom of the console.
  • Ctrl + F  –  Open search for Command Prompt.
  • Ctrl + Home  –  Scroll to the top of the console.
  • Ctrl + M  –  Starts mark mode.
  • Ctrl + Up arrow key  –  Move the screen up one line.
  • Ctrl + V (or Shift + Insert)  –  Paste content from clipboard.
  • Left or right arrow keys  –  Move the cursor left or right in the current line.
  • Page Down  –  Move cursor one page down.
  • Page Up  –  Move cursor one page up.
  • Up or down arrow keys  –  Cycle through the command history of the current session.

Windows Settings page shortcuts

Utilize the below shortcuts to navigate quickly on the Windows Settings page.

  • Alt + underline letter  –  Actions the setting identified by the letter.
  • Arrow keys  –  Select a button of the active setting.
  • Backspace  –  Opens the folder one-level app in the Open or Save As dialog.
  • Ctrl + number of tab  –  Jumps to tab position.
  • Ctrl + Shift + Tab  –  Cycles back through the tabs.
  • Ctrl + Tab  –  Cycles forward through the tabs.
  • Shift + Tab  –  Moves back through the settings.
  • Spacebar  –  Checks or clears the option in focus.
  • Tab  –  Moves forward through the settings.