OneNote

Get the most out of OneNote with these little-known features

Hi, Microsoft 365 Insiders! I’m Gokul Subramaniam, and I’m a Product Manager on the OneNote team. If you’re a OneNote fan, you’re aware of the many ways it can streamline and boost note-taking and content generation. But even the most experienced OneNote users among us might not be benefitting from all it has to offer, which is why we’ve singled out some of our favorite features that you may not be aware of – or wish existed but didn’t know they already did. Check them out, supercharge your productivity, and let us know what you think!

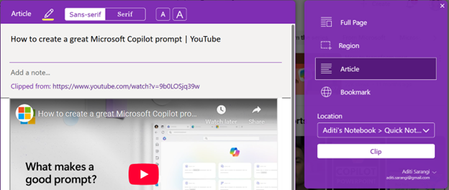
Clip web content with Web Clipper

With OneNote Web Clipper, you can easily capture and save online materials directly into your OneNote notebooks, saving you time manually copying information and allowing you to preserve the content in its original form. By simply adding the OneNote Web Clipper extension to your preferred browser, you can instantly begin clipping articles, recipes, YouTube videos, or other types of web pages, and neatly organize them into your notes for reference later.

A screenshot of Web Clipper clipping a video about Microsoft Copilot prompts.

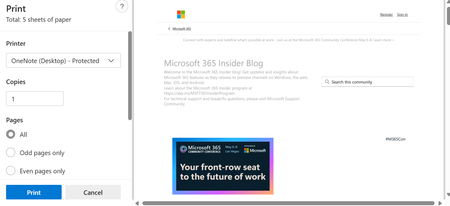
Save and showcase files with print to OneNote

The print to OneNote feature enables you to send any type of file, including documents, spreadsheets, emails, drawings or diagrams, web pages, and PDFs, directly to a OneNote notebook as a printout. This can be particularly useful for students saving lecture notes, professionals archiving important reports or correspondences, and anyone else wanting to keep a digital copy of physical documents for easy access and annotation. Simply select Print on the file, and then choose OneNote (Desktop) or OneNote (Desktop) – Protected in the Printer list to add it as an image in your chosen notebook or page.

A screenshot of someone saving the Microsoft 365 Insider Blog page to OneNote in the print screen.

Availability: This feature is only available to OneNote on Windows users.

Recover lost or important edits with version history

Made a mistake or written over crucial content in OneNote? You can restore previous versions of your notes, ensuring that all important information is not lost for good. Perhaps most crucially, this feature gives you peace of mind that should someone else have access to your notebook and make edits, you can still go back to earlier versions if you don’t like what they’ve added. Try it out the next time you want to track progress on a school essay, or revisit old versions of a work project, or revert back to an earlier draft. Under History, you can locate a version of your notebook based on timeframe or author, view all previous page versions, and delete certain versions you no longer need.

A moving image of someone looking at Page Versions of a OneNote notebook about a Montana camping trip.

Availability: This feature is only available to OneNote on Windows, OneNote for Mac, and OneNote for the web users.

Store and revert deleted information with Recycle Bin

The Recycle Bin in OneNote is a feature that temporarily stores deleted notes and sections, allowing users to recover content that’s valuable or has been accidentally removed. Items in the Recycle Bin can be restored to a specific location in your notebook or permanently deleted, providing an additional layer of security against unintentional data loss. For instance, you can bring back mistakenly deleted project plans, or pull out discarded meeting notes, from the last 60 days.

A zoomed in screenshot of the Notebook Recycle Bin button in OneNote.

Availability: This feature is only available to OneNote on Windows, OneNote for Mac, and OneNote for the web users.

Quick machine Recovery

New features gradually being rolled out to the Beta Channel with toggle on*

Introducing quick machine recovery

Quick machine recovery (QMR), part of the Windows Resiliency Initiative announced at Ignite 2024 is now available in the latest Windows Insider Preview build. This feature, when enabled, addresses widespread boot issues on Windows 11 devices by automatically detecting and applying fixes directly from the Windows Recovery Environment (WinRE) thereby reducing the system downtime and manual intervention. When a critical boot failure occurs, the device enters WinRE, connects to the network, and sends diagnostic data to Microsoft, which can then deploy targeted remediations via Windows Update. IT admins are encouraged to enable, customize, or test this feature, which is enabled by default for home users. Windows Insiders can start testing it today and provide feedback via Feedback Hub to refine the feature further. In the Feedback Hub app on your Windows device, select Recovery and Uninstall > Quick Machine Recovery. Keep an eye out for a test remediation package coming your way in the next few days, allowing you to experience the quick machine recovery in action.

Microsoft Word

Find and Replace content in a word document:

On the “Home” Tab in the “Editing” section, click the down arrow and select either Find or Replace.

The Find or Replace Navigation will open in the left section of the document.

Type the required content to find in the search box and the results will show

If you selected Replace: The Find and Replace search box will display in a window. Fill in the Find What text in the firsts box and what you want to replace it with in the “Replace with:” dialogue box. Select either “Replace” aor “Replace All“. You will see that the R in Replace and the A in “Repalace All” is under lined so you can use those characters on the keyboard, without having to click on the buttons. If you choose “Replace” you can then click “F” to find the next instance without replacing the instance to skip some choices.

To open the “Find” or “Replace” sections use the keyboard shortcut sequence: CTL F to Find and CTL H to Replace or type “Find” or “Replace” in the Tell me what you want to do Search feature in Ribbon.

I hope that this tip will help you

InfoPath

Microsoft InfoPath is now obsolte and Power Apps is the recomended Replacement.

Microsoft InfoPath a forms generator for SharePoint or desktop is being phased out and has been replaced by other Microsoft products such as SharePoint Lists, Flow, and PowerApps.

PowerApps, in particular, is highlighted as a superior replacement due to its ability to build new business applications quickly and efficiently. Microsoft announced the discontinuation of InfoPath on January 31, 2014, and PowerApps was introduced as the replacement in late 2016.

Power Apps is a suite of tools within the Microsoft Power Platform designed to help users create custom business applications without extensive coding knowledge. It includes services, connectors, and a data platform that enables rapid development of applications tailored to specific business needs.

Users can build various types of apps, such as canvas apps, model-driven apps, and cards, using Power Apps Studio, which provides a user-friendly interface similar to building a slide deck in Microsoft PowerPoint. These apps can be accessed from any device, including mobile phones and tablets, and can run offline, syncing data when a connection is re-established.

Power Apps integrates with other Microsoft services like Azure, Dynamics 365, and Teams, as well as third-party applications, allowing for seamless data connectivity and automation. It also supports custom code development and provides a low-code programming language called Power Fx, which can be used across the Power Platform.

Power Apps Studio supports a wide range of controls, including forms, buttons, date pickers, text inputs, rectangles, text boxes, and vertical galleries, among others. These controls help you create interactive and functional apps tailored to your business needs.

For those experiencing performance issues with Power Apps Studio, switching to Microsoft Edge as your browser is highly recommended, as it can significantly improve the performance and reduce lag.

Microsoft PowerApps Studio Desktop was deprecated in favor of the web studio experience. The web studio offers a more up-to-date and feature-rich environment for creating canvas apps, surpassing the capabilities of the desktop app in both features and performance. As of June 1, 2018 the desktop app’s authoring experience was deprecated.

Power Apps basic Tutorial

Quantum Computing

Why IT pros need to prep for the quantum computing era

Quantum computing can offer unprecedented processing power but also break existing encryption methods. This development means there’s an urgency for data security professionals to prepare well in advance, since it’s predicted that the quantum computing market may reach $50 billion by the end of the decade.

Full Story: Forbes (tiered subscription model) (3/21) 

New quantum computer computers are starting to flood the market, and I do believe that we may see these chips in mobile devices rolling out this year, and these devices will be able to connect to the Quantum Financial System (QFS). The new XPR network on the blockchain for everyone.

The new world is closer than you can imagine.

Excel Enhancements

Copilot + Excel = Your Data Superpower

Copilot in Excel simplifies data analysis by enabling you to search for and import data from Word, PowerPoint, PDF documents, or other Excel files into your spreadsheets. Save time and gain insights with this powerful tool.

Search and import data with Copilot in Excel

Data analysis is a critical yet challenging task for many business professionals, as creating and preparing data, then gaining insights from it and conducting advanced analyses, can be time-consuming and complex.

Copilot in Excel can help! We’re thrilled to announce that Copilot in Excel can now reference Word, Excel, PowerPoint, and PDF files, making the entire data collection and analysis process faster, simpler, and more intuitive.

This new capability works for gathering information such as:

  • Web content: You can seamlessly search the web directly within Copilot in Excel to find public information like dates, statistics, and more without disrupting your workflow. For instance, you can look up a list of countries and their exchange rates, and easily paste these results into a table. 
  • Internal content: For example, you can ask Copilot in Excel to list the announcements from a newsletter drafted in Word, and Copilot will respond with a list that you can insert into a new spreadsheet. 
  • Organizational information: You can ask Copilot for all the employees who report to a specific manager and insert this list into a spreadsheet. 
  • Data from another Excel file: One of our top user requests is toimport data from another Excel file. This is possible with Power Query, but doing so takes time and knowledge – not to mention, searching for the right file can be frustrating. Now you can ask Copilot for help finding and importing a table from an Excel file using everyday language. For example, say you want to add budget details from another Excel spreadsheet to your sales team table: You can describe the data that you need, and Copilot will help you import it. Because this import is powered by Power Query, it brings precise data directly from your organization’s data sources as a refreshable connection. As data is updated in the budget file, it also updates in your sales team table.

How it works

  1. On the Home tab in Excel, select Copilot
  2. Ask Copilot a question about the data you are looking for. 
  3. Ask follow-up questions to Copilot’s responses until you’re happy with the results!

Video provider requires cookies to play the video. Accept to continue or watch it directly on the provider’s site.Accept

NOTE: For results that are from external data, make sure you see reference(s) at the end of the response.

Scenarios to try  

Try prompting Copilot in Excel with:

  • “Search the web for an itinerary for a month-long trip to Europe in a table format.” 
  • “Search the web for a list of 15 intermediate-level vocabulary words in Spanish and their translations.”
  • “Show me next week’s meetings and to-do items in a table.”
  • “List yesterday’s emails in a table, with sender, subject line, and importance.” 

Known limitations

  • Importing refreshable data is only supported for Excel files with tables, stored on your SharePoint or OneDrive. 
  • Addressing workbook data and asking for external data simultaneously is not fully supported yet.

Requirements

To use this feature, you must have: 

If Copilot responds that it can’t access your organizational data, verify if Restricted SharePoint Search is turned on (for Enterprise search).

New Paint in Windows

Paint now makes it easier to create

Paint now comes with new AI-powered tools to help you edit images like a pro and create art like a visionary. Included in the latest version of Windows 11, Paint is your new creative partner.

Paint Features now available:

This is a huge update from the previous versions that was difficult to remove backgrounds, but working with layers was never possible. I am eager to try it and see how it works.

Windows 11 Insider Preview

New features gradually being rolled out to the Beta Channel with toggle on*

Making sharing files in Windows easier

Sharing files in Windows is getting a lot easier and quicker with our new drag tray feature. When you start dragging a local file with mouse (or touch) from File Explorer or your desktop, a handy tray appears at the very top of your screen allowing you to drop the file into one of the displayed apps or choose “More…”  to open the Windows share window.

New drag tray UI that appears at the top of your screen when dragging a local file from File Explorer or your desktop.

Changes and Improvements gradually being rolled out to the Beta Channel with toggle on*

[Start menu] 2 Versions

Microsoft is introducing two new views to the “All” page in the Start menu: grid and category view. Grid and list view shows your apps in alphabetical order and category view groups all your apps into categories, ordered by usage. This change is gradually rolling out so you may not see it right away. We plan to begin rolling this out to Windows Insiders who are receiving updates based on Windows 11, version 24H2 in the Dev and Beta Channels soon.

The All page in the Start menu with the new grid view.
The All page in the Start menu with the new category view.

WordPress anchors

Creating anchor links on a WordPress Page

The process takes 2 steps

  1. creating the place holder or anchor point
  2. inserting the link on the page

The first step is to select the section you want your readers to arrive at when they click the page jump. To do this, we can create what is known as an “anchor” on the block you want to jump to.

  1. Click on the block you want to add the anchor to. Many common blocks support anchors, including Paragraph, Heading, Image, Columns, and Buttons.
  2. View the block’s settings in the right sidebar. If you do not see the sidebar on the right, click the Settings icon in the top right corner to bring up the settings. This icon looks like a square with two uneven columns:
The Settings icon at the top of the WordPress Editor highlighted.
The settings icon in the top right corner
  1. At the bottom of the block settings, click on Advanced.
  2. Type a word in the HTML Anchor box. This will become your anchor. Be sure to use a unique word that isn’t already being used as an anchor somewhere else on the page. If you want to use more than one word, it will automatically insert a hyphen (-) between the words, like this: two-words:
Adding two hyphenated words in the HTML Anchor section to create a page jump.

Next, we’re going to create the page jump link itself. Your visitors will click on this to arrive at the section you created in step 1.

  1. Type some text, or add an image, button, or navigation menu item for your readers to click.
  2. Select the text/image/button/menu item and click the link option in the block’s toolbar. The link option is an icon that looks like the actual link of a chain, as highlighted here:
  3. Type in the HTML Anchor you created in Step 1, starting with the hashtag (#) symbol. For example, if you created an anchor named create-a-page-jump you would type your link as #create-a-page-jump
  4. Click Save/Update/Publish in the upper right corner of the editor to save your changes.

That’s it! You can now test your link on the public page to make sure the link you created in Step 2 leads you to the anchor you created in Step 1. Note that the page jump links will not work when you preview a page or post, so test on the published version.

Page Jumps in a Navigation Menu

You can create page jumps from your navigation menu that link to a specific part of a page. This is common for sites that have a long scrolling homepage. Page jumps make it easier for visitors to view the section of the homepage they want.

  1. The first step is to create an anchor as the spot to jump to.
  2. In your menu, add a new item that’s a Custom Link.
  3. In the Text field, write whatever you would like the menu item to be called. This will not affect the page jump.
  4. In the URL field, write your anchor with a hashtag (#) symbol in front of it as described above.
How to add a page jump to the navigation menu using the Custom Link option.
Adding a Page Jump in the menu

Keep in mind that a page jump like #my-anchor will only work on the same page that the anchor is on. If you wish to jump to a section of a different page, see the next section of this guide.

Jump to a Different Page

Page jumps don’t have to be used only for linking to sections within the same page. You can use a page jump to link from one page to a specific area on another page.

The difference is that instead of linking just to the anchor, like how we wrote our link as #create-a-page-jump in step 2 above, we would link to the full page URL plus the anchor.

For example, if your page has the following URL:

https://yourgroovydomain.com/example

and you create an anchor called unique-identifier on that page, then the full jump link would be:

https://yourgroovydomain.com/example/#unique-identifier

To create a jump link back to the top of the page:

  1. Add an anchor to a block at the beginning of your page.
  2. Lower down on your page, type some text like “back to top” or “jump to the beginning”.
  3. Link that text to your anchor.

PeopleCert

PeopleCert books are now on Amazon!

PeopleCert recently joined Amazon as a seller! This means that we can now instantly order our Official ITIL, PRINCE2 and other books—without purchasing a certification. Delving into these high-quality materials at your own pace before committing to a certification enables you to tailor your learning journey to your individual needs.   We’ll be adding new stock to our store, so have a look at our books on Amazon today and spread the word!     Browse PeopleCert books