Desktop shortcuts

The following desktop keyboard shortcuts allows you to efficiently open, close, navigate, and perform tasks across the desktop environment, including the Start menu, Taskbar, Settings, and more.

  • Alt + Esc  –  Cycle through open windows.
  • Alt + F4  –  Close active window. (If no active window is present, a shutdown box appears.)
  • Alt + F8  –  Reveals typed password in Sign-in screen.
  • Alt + Left arrow key  –  Go back.
  • Alt + Page Down  –  Move down one screen.
  • Alt + Page Up  –  Move up one screen.
  • Alt + Right arrow key  –  Go forward.
  • Alt + Spacebar  –  Open context menu for the active window.
  • Alt + Tab  –  Switch between open apps while pressing Tab multiple times.
  • Alt + Underlined letter  –  Runs command for the underlined letter in apps.
  • Ctrl + Alt + Tab  –  View open apps.
  • Ctrl + Arrow keys  –  Change Start menu size.
  • Ctrl + Arrow keys (to select) + Spacebar  –  Select multiple items on desktop or File Explorer.
  • Ctrl + Click a grouped app button  –  Cycle through windows in the group from the Taskbar.
  • Ctrl + Down arrow key  –  Move the cursor to the beginning of the next paragraph.
  • Ctrl + F5 (or) Ctrl + R  –  Refresh current window.
  • Ctrl + Left arrow key  –  Move the cursor to the beginning of the previous word.
  • Ctrl + Right arrow key  –  Move the cursor to the beginning of the next word.
  • Ctrl + Shift  –  Switch keyboard layout.
  • Ctrl + Shift + Arrow key  –  Select block of text.
  • Ctrl + Shift + Click app button  –  Run app as administrator from the Taskbar.
  • Ctrl + Shift + Esc  –  Open Task Manager.
  • Ctrl + Spacebar  –  Enable or disable Chinese IME.
  • Ctrl + Up arrow key  –  Move the cursor to the beginning of the previous paragraph
  • Shift + Arrow keys  –  Select multiple items.
  • Shift + Click app button  –  Open another instance of an app from the Taskbar.
  • Shift + F10  –  Open context menu for selected item.
  • Shift + Right-click app button  –  Show window menu for the app from the Taskbar.
  • Shift + Right-click grouped app button  –  Show window menu for the group from the Taskbar.

Windows Key Options

The “Windows key,” when used with other keys, enables you to execute numerous handy tasks such as launching Settings, File Explorer, the Run command, and apps pinned to the Taskbar, as well as open specific features like Narrator or Magnifier. Additionally, you can manage windows and virtual desktops, take screenshots, lock the computer, and more.

Here is a list of the most common keyboard shortcuts utilizing the Windows key.

  • Windows Key   –  Open Start menu.
  • Windows Key  + A  –  Open Action center.
  • Windows Key  + Alt + D  –  Open date and time in the Taskbar.
  • Windows Key  + Alt + Number (0-9)  –  Open Jump List of the app in number position in the Taskbar.
  • Windows Key  + B  –  Set focus notification area in the Taskbar.
  • ​​​​​​​Windows Key  + Comma (,)  –  Temporarily peek at the desktop.
  • Windows Key  + Ctrl + D  –  Create a virtual desktop.
  • Windows Key  + Ctrl + Enter  –  Open Narrator.
  • Windows Key  + Ctrl + F  –  Open search for the device on a domain network.
  • Windows Key  + Ctrl + F4  –  Close active virtual desktop.
  • Windows Key  + Ctrl + Left arrow  –  Switch to the virtual desktop on the left.
  • Windows Key  + Ctrl + Number (0-9)  –  Switch to the last active window of the app in the number position in the Taskbar.
  • Windows Key  + Ctrl + Q  –  Open Quick Assist.
  • Windows Key  + Ctrl + Right arrow  –  Switch to the virtual desktop on the right.
  • Windows Key  + Ctrl + Shift + B  –  Wake up the device when black or a blank screen.
  • Windows Key  + Ctrl + Shift + Number (0-9)  –  Open another instance as an administrator of the app in the number position in the Taskbar.
  • Windows Key  + Ctrl + Spacebar  –  Change previous selected input option.
  • Windows Key  + D  –  Display and hide the desktop.
  • Windows Key  + Down arrow key  –  Minimize app windows.
  • Windows Key  + E  –  Open File Explorer.
  • Windows Key  + Esc  –  Exit magnifier.
  • Windows Key  + F  –  Launch Feedback Hub app.
  • Windows Key  + Forward-slash (/)  –  Start IME reconversion.
  • Windows Key  + G  –  Launch Game bar app.
  • Windows Key  + H  –  Open dictation feature.
  • Windows Key  + Home  –  Minimize or maximize all but the active desktop window.
  • Windows Key  + I  –  Open Settings.
  • Windows Key  + J  –  Set focus on a tip for Windows 10 when applicable.
  • Windows Key  + K  –  Open Connect settings.
  • Windows Key  + L  –  Locks computer.
  • Windows Key  + Left arrow key  –  Snap app or window left.
  • Windows Key  + M  –  Minimize all windows.
  • Windows Key  + Minus (-)  –  Zoom out using the magnifier.
  • Windows Key  + Number (0-9)  –  Open the app in number position in the Taskbar.
  • Windows Key  + O  –  Lock device orientation.
  • Windows Key  + P  –  Open Project settings.
  • Windows Key  + Pause  –  Show System Properties dialog box.
  • Windows Key  + Period (.) or Semicolon (;)  –  Open emoji panel.
  • Windows Key  + Plus (+)  –  Zoom in using the magnifier.
  • Windows Key  + PrtScn  –  Capture a full screenshot in the “Screenshots” folder.
  • Windows Key  + R  –  Open Run command.
  • Windows Key  + Right arrow key  –  Snap app or window right.
  • Windows Key  + S (or Q)  –  Open Search.
  • Windows Key  + Shift + Down arrow key  –  Windows 11: Restore the window if it is snapped or maximized. Windows 10: Maximize or minimize active windows vertically while maintaining width.
  • Windows Key  + Shift + Left arrow key  –  Move active window to monitor on the left.
  • Windows Key  + Shift + M  –  Restore minimized windows on the desktop.
  • Windows Key  + Shift + Number (0-9)  –  Open another app instance in the number position in the Taskbar.
  • Windows Key  + Shift + Right arrow key  –  Move active window to monitor on the right.
  • Windows Key  + Shift + S  –  Create part of the screen screenshot.
  • Windows Key  + Shift + Up arrow key  –  Stretch desktop window to the top and bottom of the screen.
  • Windows Key  + Shift + V  –  Cycle through notifications.
  • Windows Key  + Spacebar  –  Change keyboard layout and input language.
  • Windows Key  + T  –  Cycle through apps in the Taskbar.
  • Windows Key  + Tab  –  Open Task View.
  • Windows Key  + U  –  Open Ease of Access settings.
  • Windows Key  + Up arrow key  –  Maximize app windows.
  • Windows Key  + V  –  Open Clipboard bin.
  • Windows Key  + W  –  Open the Windows Ink Workspace.
  • Windows Key  + X  –  Open Quick Link menu.
  • Windows Key  + Y  –  Change input between desktop and Mixed Reality.
  • Windows Key  + Z  –  Switch input between the desktop experience and Windows Mixed Reality.

Windows Server Upgrade paths

In-place upgrade from Windows Server 20xx to a different version are shown in the table below. The following upgrade paths are officially supported by Microsoft.

Image

From the table above Microsoft does not support an upgrade from Server 2012 R2 directly to Server 2022, so it would take an intermediate step or people will have to resort to a clean install.

Whether meet the prerequisites for upgrading?

For details about the upgrade steps, please refer to the following steps: Perform an in-place upgrade of Windows Server | Microsoft Learn

What went wrong with the upgrade and can you provide a screenshot?

Best Regards,

Hania Lian

Copilot learning

Microsoft Learn

Copilot learning hub

Copilot is an AI assistant powered by language models, which offers innovative solutions across the Microsoft Cloud. Find what you, a technical professional, need to enhance your productivity, creativity, and data accessibility, and make the most of the enterprise-grade data security and privacy features for your organization.

Start your Copilot learning journey

Adding Stat Holiday to Outlook

1. Log in to Outlook.com

2. On the Outlook desktop app, click on the “File” tab.

3. Click on “Options.” 

How to add holidays to Outlook calendar 1
You can find this link in the left navigation bar in Outlook.

4. Click on “Calendar” in the pop-up window, then click on the button labeled “Add Holidays.”

How to add holidays to Outlook calendar 2
The Calendar menu is the third option down in the Outlook Options window. 

5. Scroll through the list until you find the country that observes the holidays you wish to add. 5. Click on that country’s name so that the box next to it shows a checkmark.

How to add holidays to Outlook calendar 3
You can choose more than one country if you wish.

6. Click “OK” when you are done. 

7. Click “OK” again to confirm and close out of the pop-up windows.

Replace a Classic Root Site M365

Replacing root site with a new modern site is a two-step process. Make sure you have the latest PowerShell module for SharePoint Online installed (16.0.8812.1200 or later). To get the installed PowerShell module version, use the following:

1(Get-Module-NameMicrosoft.Online.SharePoint.PowerShell).Version.ToString()

Step 1: 

Create a new modern SharePoint site collection using a communication site template and customize it as per your requirements, such as adding necessary resources like document libraries, navigation, etc. You can also use any existing modern communication site in your SharePoint environment. This will be your new top-level site.

Step 2:

Execute the Invoke-SiteSwap cmdlet to start replacing the old site with the new One
Here is the SharePoint Online PowerShell script to swap a new SharePoint site in place of the old site collection. As its name suggests, the Invoke-SPOSiteSwap PowerShell command swaps a site collection with another one, while taking a backup of the source site collection. Also, it creates a site redirect from the source location to the target location (unless you disable it with -DisableRedirection switch!).

The Root site swap process may take a moment to complete. Please note that the source and target sites can’t connect to an Office 365 group. They also can’t be hub sites or associated with a hub (Remove the Hub site association before swapping and re-associate). Typically, it takes a few minutes to complete. All subsites contained with the source and target sites will be swapped, and this cmdlet takes the following parameters:

  • SourceURL – New site collection that you want to swap with your old site. The source site must be an existing classic team site (STS#0), Modern Team Site (STS#3), or Communication Site (SITEPAGEPUBLISHING#0)
  • TargetURL – This is your existing Classic site in the Office 365 tenant.
  • ArchiveURL – Archival URL is the location to archive an existing site. It must not currently exist (even as a deleted site in Recycle bin). This allows you to roll back your changes if required.

The Invoke-SPOSiteSwap cmdlet doesn’t convert your classic site collection into a modern one. Instead, it replaces the current site collection with another existing one! Moreover, any static link must be fixed manually.

Summary

In conclusion, replacing the classic root site collection with a modern site in SharePoint Online can be accomplished using either SharePoint Admin Center or PowerShell. This process can be useful when you’re looking to modernize your SharePoint Online environment and take advantage of the new features and functionalities available on modern sites. Overall, replacing the classic root site collection with a modern communication site that offers a modern user interface that is more visually appealing, Mobile-Friendly, advanced web parts, and intuitive, responsive user experience helps to increase productivity and collaboration.

Reset the video driver

1.

To reset the video driver on Windows 10, you can use the keyboard shortcut Win + Ctrl + Shift + B.

This will cause the screen to flicker for a few seconds or go black for a second, and then everything will return to normal.

This method is safe and won’t affect running apps and opened documents. If the driver is misbehaving a lot, chances are that it has gone corrupt. Another way to restart the driver is by disabling and re-enabling the Display adapter from Device Manager. It is important to check if the Windows Key is not disabled as it can accidentally shift the focus.

2.

Reset the Graphics Card Driver Using Device Manager

If you are still facing display issues even after applying the keyboard shortcut to refresh your graphics card driver, you can try resetting it with the Device Manager.

Device Manager is available on all Windows versions and provides a list of all the hardware components connected to your PC. Here, you can find the graphics card driver as well, which can be reset if needed.

Here are the steps to use the Device Manager to reset the graphics card driver:

  1. First, open the Device Manager by searching for it in the Windows search box and clicking on the Device Manager icon from the Start menu.launch device manager from start menu
  2. Then, locate and expand the Display adapters section in the Device Manager window.
  3. Right-click on your graphics card driver and select Properties from the context menu.graphics card properties
  4. Under the Properties window, switch to the Driver tab and click on the Disable Device button.disable graphics card driver
  5. Confirm the disable action and wait for a few moments.
  6. After the driver is disabled, again right-click on your graphics card driver, and select Properties from the menu that appears.
  7. Switch to the Driver tab, and click on the Enable Device button.enable device driver
  8. Wait for the driver to be re-enabled.

This action will reset your graphics card driver and may clear up any display issues you were having.

3. Uninstall and Reinstall the Graphics Driver to Reset It

If nothing else works, you can try uninstalling and reinstalling the graphics driver. Uninstalling the driver will remove it from your system completely, which should resolve any possible glitches or compatibility issues that might have been causing the display problems.

To uninstall and then reinstall the graphics card driver on Windows, follow these steps:

  1. First, open the Device Manager by searching for it in the Windows search box and clicking on the Device Manager icon from the Start menu.
  2. Then, locate and expand the Display adapters section.
  3. Right-click on your graphics card driver and select Uninstall device from the context menu.uninstall graphics driver
  4. Confirm the uninstall action to remove all its files completely.
  5. After the driver is removed, reboot your device.
  6. Windows will detect a missing driver and prompt you to install it automatically. If not, head to your graphics card manufacturer’s website and download the suitable drivers for your device.

More blank page tricks

Word for Microsoft 365, Word 20XX

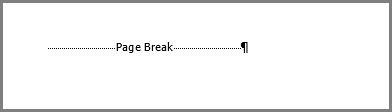
Page breaks tell Word where to start a new page. A manual page break might be making an unwanted blank page in your document.

  1. To see manual page breaks, switch to showing paragraph marks: Press Ctrl+Shift+8.
  2. Now you can select the page break and delete it.

A page break at the bottom of a Word page

Section break problems

In the middle of a document, deleting section breaks can cause formatting problems. In these cases, try changing the section break to one that doesn’t generate a new page. Here’s how:

  1. Double select the section break.
  2. On the Layout tab of the Page Setup dialog box, select the Section start drop down and select Continuous.
  3. Select OK.

Odd, Even, and Next cause blank pages
Next Page, Odd Page, and Even Page section breaks may create a blank page in your document. If the blank page occurs at the end of your document and you have a section break there, place your cursor directly before the section break and press Delete.

Tip: To more easily find section breaks, try switching to Draft on the View tab.

Word Delete Blank Page

Word for Microsoft 365 Word for Microsoft 365 for Mac Word 2021

Word includes a non-deleteable end-paragraph that sometimes gets pushed out to a new, blank page at the end of a document. The way to delete the page is to make the end-paragraph fit onto the preceding page. The most sure-fire way is to make the end-paragraph very small (1 point):

  1. Press Ctrl+Shift+8 to show paragraph marks.
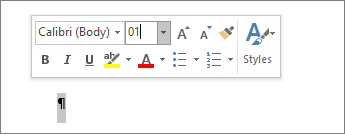
  2. Select the paragraph mark.
  3. Select inside the Font size box, type 01, and then press Enter .Setting font size to 1
  4. The paragraph now fits on the preceding page, removing the unwanted blank page.
  5. Press Ctrl+Shift+8 again to hide the paragraph marks (⌘+8 on a Mac).

If that paragraph still doesn’t fit on the preceding page, you can make the bottom margin smaller (Layout tab > Margins > Custom Margins, and set the bottom margin to something small, like 0.3 inches).

Tip: If the paragraph mark has a square bullet next to it, the paragraph might have the Page break before option turned on. To turn it off, right-select the empty paragraph, select Paragraph Settings (Home tab), and on the Lines and Page Breaks tab of the dialog box, uncheck Page break before.

Word – Delete a page

Word for Microsoft 365 Word for Microsoft 365 for Mac Word 2021

To delete a page that contains text, graphics, or empty paragraphs, select the content to delete, and press Delete. You can also do this:

  1. Click or tap anywhere in the page you want to delete, press Ctrl+G.
  2. In the Enter page number box, type \page.
  3. Press Enter on your keyboard, and then select Close.
  4. Verify that a page of content is selected, and then press Delete on your keyboard.

To remove blank pages in the middle or at the end of your document, see Delete a blank page.