Reset the video driver

1.

To reset the video driver on Windows 10, you can use the keyboard shortcut Win + Ctrl + Shift + B.

This will cause the screen to flicker for a few seconds or go black for a second, and then everything will return to normal.

This method is safe and won’t affect running apps and opened documents. If the driver is misbehaving a lot, chances are that it has gone corrupt. Another way to restart the driver is by disabling and re-enabling the Display adapter from Device Manager. It is important to check if the Windows Key is not disabled as it can accidentally shift the focus.

2.

Reset the Graphics Card Driver Using Device Manager

If you are still facing display issues even after applying the keyboard shortcut to refresh your graphics card driver, you can try resetting it with the Device Manager.

Device Manager is available on all Windows versions and provides a list of all the hardware components connected to your PC. Here, you can find the graphics card driver as well, which can be reset if needed.

Here are the steps to use the Device Manager to reset the graphics card driver:

  1. First, open the Device Manager by searching for it in the Windows search box and clicking on the Device Manager icon from the Start menu.launch device manager from start menu
  2. Then, locate and expand the Display adapters section in the Device Manager window.
  3. Right-click on your graphics card driver and select Properties from the context menu.graphics card properties
  4. Under the Properties window, switch to the Driver tab and click on the Disable Device button.disable graphics card driver
  5. Confirm the disable action and wait for a few moments.
  6. After the driver is disabled, again right-click on your graphics card driver, and select Properties from the menu that appears.
  7. Switch to the Driver tab, and click on the Enable Device button.enable device driver
  8. Wait for the driver to be re-enabled.

This action will reset your graphics card driver and may clear up any display issues you were having.

3. Uninstall and Reinstall the Graphics Driver to Reset It

If nothing else works, you can try uninstalling and reinstalling the graphics driver. Uninstalling the driver will remove it from your system completely, which should resolve any possible glitches or compatibility issues that might have been causing the display problems.

To uninstall and then reinstall the graphics card driver on Windows, follow these steps:

  1. First, open the Device Manager by searching for it in the Windows search box and clicking on the Device Manager icon from the Start menu.
  2. Then, locate and expand the Display adapters section.
  3. Right-click on your graphics card driver and select Uninstall device from the context menu.uninstall graphics driver
  4. Confirm the uninstall action to remove all its files completely.
  5. After the driver is removed, reboot your device.
  6. Windows will detect a missing driver and prompt you to install it automatically. If not, head to your graphics card manufacturer’s website and download the suitable drivers for your device.

More blank page tricks

Word for Microsoft 365, Word 20XX

Page breaks tell Word where to start a new page. A manual page break might be making an unwanted blank page in your document.

  1. To see manual page breaks, switch to showing paragraph marks: Press Ctrl+Shift+8.
  2. Now you can select the page break and delete it.

A page break at the bottom of a Word page

Section break problems

In the middle of a document, deleting section breaks can cause formatting problems. In these cases, try changing the section break to one that doesn’t generate a new page. Here’s how:

  1. Double select the section break.
  2. On the Layout tab of the Page Setup dialog box, select the Section start drop down and select Continuous.
  3. Select OK.

Odd, Even, and Next cause blank pages
Next Page, Odd Page, and Even Page section breaks may create a blank page in your document. If the blank page occurs at the end of your document and you have a section break there, place your cursor directly before the section break and press Delete.

Tip: To more easily find section breaks, try switching to Draft on the View tab.

Word Delete Blank Page

Word for Microsoft 365 Word for Microsoft 365 for Mac Word 2021

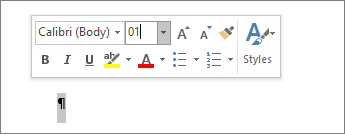
Word includes a non-deleteable end-paragraph that sometimes gets pushed out to a new, blank page at the end of a document. The way to delete the page is to make the end-paragraph fit onto the preceding page. The most sure-fire way is to make the end-paragraph very small (1 point):

  1. Press Ctrl+Shift+8 to show paragraph marks.
  2. Select the paragraph mark.
  3. Select inside the Font size box, type 01, and then press Enter .Setting font size to 1
  4. The paragraph now fits on the preceding page, removing the unwanted blank page.
  5. Press Ctrl+Shift+8 again to hide the paragraph marks (⌘+8 on a Mac).

If that paragraph still doesn’t fit on the preceding page, you can make the bottom margin smaller (Layout tab > Margins Custom Margins, and set the bottom margin to something small, like 0.3 inches).

Tip: If the paragraph mark has a square bullet next to it, the paragraph might have the Page break before option turned on. To turn it off, right-select the empty paragraph, select Paragraph Settings (Home tab), and on the Lines and Page Breaks tab of the dialog box, uncheck Page break before.

Word – Delete a page

Word for Microsoft 365 Word for Microsoft 365 for Mac Word 2021

To delete a page that contains text, graphics, or empty paragraphs, select the content to delete, and press Delete. You can also do this:

  1. Click or tap anywhere in the page you want to delete, press Ctrl+G.
  2. In the Enter page number box, type \page.
  3. Press Enter on your keyboard, and then select Close.
  4. Verify that a page of content is selected, and then press Delete on your keyboard.

To remove blank pages in the middle or at the end of your document, see Delete a blank page.

App Launch

Did You Know

You can launch apps on your on the “TaskBar” by pressing:

  • WIN + 1 (to Launch the first app on your “TaskBar”)
  • WIN +2 (to launch the second App on your “TaskBar“)
  • WIN + X (for additional apps)

Stay tuned for more tips.

Microsoft VTS

Join the Microsoft Virtual Training series

Enhance your technical skills with interactive webinars for core customer technical scenarios.

Local training and events

Take advantage of the latest Canadian Microsoft training and events to help you develop your team’s talent.

Let’s get started

Find your role, select a product or solution and pick the learning path for your skill level to begin the recommended training for Microsoft products and solutions.

Server Technician

What Is a Server Support Technician?

A server support technician manages, repairs and analyzes an organization’s servers, making sure everything is running, up to date and secure.

Other duties of a server support technician may include the following:

  • Running routine security and vulnerability scans
  • Assemble and install physical hardware as and when required
  • Maintain an accurate inventory of equipment and connections
  • Oversee the disposal of obsolete and sensitive equipment
  • Install and support software packages
  • Operate and monitor complex computer systems, and network infrastructure
  • Know the different server types; Authentication, database, mail, web, file and print, virtual and host servers

A server technician needs to analyze the performance of an organization’s servers and resolves any issues that may arise. Someone in this role should have great problem-solving skills and be highly knowledgeable in Windows and other Server Operating systems. They are also responsible for installing hardware, racks and operating systems.

Many technical staff may work remotely and on a contractual basis, working where the problems occur. Strong verbal and written communication skills are an essential requirement for this position. People in this role must be able to work independently, with minimal to no supervision. Some of these people may very well end up as server or network design architects.

IT Career

Changing Career

Mainly (but not only) for my students in the Edmonton area, attending the ITC program at MCG Career group. You are attending a course that will propel you into a new career, an IT career, and one that you should be excited to be part of. The following tips may help you move forward and enjoy the ride.


1. Don’t just step, but jump out of your comfort zone.

2. Don’t worry too much about the first test, “IT Fundamentals”. Just focus on the content being covered each day and keep moving forward.

3. You are in a class that has various levels of IT competence, but don’t compare yourself to these. The only person you have to compete with is yourself. Attend classes at all costs and concentrate on learning something new each day.

4. One thing, don’t be afraid to ask for help from your instructor / mentor or teammates. Peer learning is always an essential skill builder for today’s technology workforce.

5. Know your 30-second “About Me” by heart and be able to give it at a moment’s notice. This statement requires that you know exactly where you want to be and what it takes to get there. I will post more about this next week.

6. Have a short term career plan ready to discuss during interviews, and consider how potential managers and other company leaders might serve as mentors and role models to get to your goals.

7. Connect and build relationships with co-students from the current class and if possible past classes to. Building a professional network should begin on the first day of class or as soon as possible thereafter.

8. Technical skills are essential to a good IT career but mastery of soft skills like communication and active listening are just as important. The critical soft skills for any IT professional are communication, collaboration, critical observation, problem solving and leadership. Possessing any or all these will set you up ahead of the crowd.

9. Great interviews begin with research, so start with the companies website and document their strong points and vision statement and work around them. The interviewer wants to know that you will fit in with the current employees and not disrupt the status quo.

10. Professional organizations and networking events are a great way to network and meet potential employers. This informal environment will be less pressure to discuss potential opportunities than a formal interview.

11. Great interviews are a conversation that is the result of planning and questions prepared ahead of time.

12. You are in the ITC program for a reason, so as soon as possible set goals for yourself, both short and longer term. This will help give you direction, and help you ask the right questions ahead of time.

13. LinkedIn is a great career tool while climbing the IT ladder. Get a head start on establishing an online presence by setting up an account. Do remember that past achievement will be an asset no matter what industry it comes from. Recruiters are always scouring here to find new clients. Connect with others and professional groups. Be there when the recruiters or companies post or search for professionals in your area.
Reflecting on the above, you have to start somewhere, so keep calm set yourself a goal and a task list, work through it one step at a time and you will be amazed how soon your actions will get you to where you want to be. You have to remember the golden rule! you control your own destiny, if you wait on others for direction, you will never be able to really go out and have fun in your new career.

We Share Knowledge

The 9 mistakes

The 9 mistakes that you as owner of a Small Business Website Should Never Make!
A) Rely on a third-party website (social media) as your primary website
B) Relinquish control by outsourcing web tasks
C) Start creating a website without a strategy or goal
D) The website design doesn’t reflect your branding and vision
E) There are no well-defined prompts for visitors to take action
F) Do not let creativity (or design) outweigh a conversion factor
G) Today any website should be built to accommodate mobile devices
H) Always consider SEO for your primary website
I) Never set it and forget about it, connect to Google analytics and monitor success and update content when necessary.

On my next post I will expand on the above.

Windows super admin

GodMode is a special folder in Windows that gives you quick access to over 200 tools and settings that are normally tucked away in the Control Panel and other windows and menus. This Mode is most helpful for advanced Windows users that work in IT, or any advanced Windows enthusiasts.

Most customers, will not see a use for having this Mode enabled on their Windows 10 systems. It’s like having your developer settings enabled on your smartphone. If you want to try it out, though, here’s how to enter God Mode in Windows 10.

How to enter God Mode in Windows 10

  1. Make sure your Microsoft system account has administrator privileges.
  2. Right-click on the Windows 10 desktop and “Create a new folder.”
  3. Right-click the the new folder and rename the folder: “GodMode.{ED7BA470-8E54-465E-825C-99712043E01C}” press enter and you’re all set!
  4. Manage to your hearts content!