Out of Office Replies

Out of Office Replies

Outlook for Microsoft 365 Outlook 2021

There are two ways to send automatic out-of-office replies. The way you use depends on the type of email account you have.

Click File, then select the image below that matches your version of Outlook.

If you see the Automatic Replies button, follow the steps to set up an automatic reply below.

If you don’t see the Automatic Replies button, follow the steps to use rules to send an out of office message.

Set up an automatic reply

  1. Select File > Automatic Replies. Automatic repliesNote: For Outlook 2007 choose Tools > Out of Office Assistant.
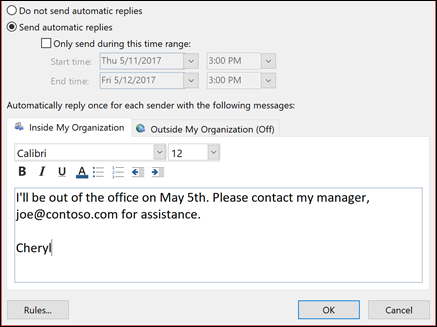
  2. In the Automatic Replies box, select Send automatic replies. Optionally, set a date range for your automatic replies. This will turn off automatic replies at the date and time you enter for the end time. Otherwise, you’ll need to turn off automatic replies manually. Note: If you don’t see Automatic Replies, use Rules and Alerts to set up your out-of-office message.
  3. On the Inside My Organization tab, type the response that you want to send to teammates or colleagues while you are out of the office. Enter your automatic reply message
  4. Note: Sending automatic replies to anyone outside my organization will send your automatic reply to every email, including newsletters, advertisements, and potentially, junk email. If you want to send automatic replies to those outside your organization, we recommend choosing My contacts only.
  5. Select OK to save your settings.

Turn off automatic out-of-office replies

When Outlook is setup to send automatic replies, you’ll see a message under the ribbon with this information. Select Turn off to disable automatic out-of-office replies. If you want to modify the dates for your automatic reply or the message sent, use the steps above to modify your settings.

Note: For Outlook 2007, to turn off out-of-office replies, select Tools > Out of Office Assistant and uncheck the Send Out of Office auto-replies checkbox.

Turn off automatic replies

Update your Automatic Replies on the Outlook mobile app

You can update your Automatic Replies from Outlook for iOS or Outlook for Android. Click here to get the app and manage your Automatic Replies on the go.

Troubleshooting: I don’t see Automatic Replies

If you don’t see Automatic Replies after selecting File, you’re probably using a Gmail, Yahoo, or other POP or IMAP account that doesn’t support the Outlook Automatic Replies feature. This feature requires an Exchange server or an Office 365 account.

You can setup a rule that will reply to incoming messages, but only if you leave Outlook running. For more information, see use rules to send an out of office message.

Organise your Inbox

Organising your Inbox

How do we keep track of this tool to stay up to date with our daily tasks and messages.

As a professional, we realise that our inbox is an important part of our daily routine.

We’ve all been there, right? After an exciting whirlwind vacation, you come back to work, open Outlook, and find two thousand unread messages waiting for you. It’s enough to make you want to go back on vacation. Or never take a vacation again.

But Outlook is a powerful program, and it can help you tame that inbox quickly—probably a lot faster than you could have imagined.

Manage your email after vacation

Preparing for vacation

Let’s follow along with Our self as we prepare to leave for a ten-day vacation.

We handle communication and coordination for five separate projects, we a member of twenty different mailing lists, and we also receives a small number of personal email messages each day.

While We are out of the office, a collogue will be the main point of contact for three of our projects, and another will handle the other two.

The last time You went on vacation, you set your Automatic Replies to let everyone know that you would be back in ten days, but didn’t do anything else. When You returned, your Inbox had grown from 50 messages to 500 messages or possibly many more.

This time, You could spend spend a few minutes the day before you leave with several of Outlook’s key features to help yourself come back from vacation stress-free.

Step 1

To set up your own automatic replies, see Send automatic out of office replies from Outlook.

We all know that setting up an Automatic Reply can head off a lot of questions and confusion for our coworkers. Since we have Microsoft 365, we can Select File Automatic Replies, and types in the following text.

Hi,

Thanks for your message. I’m out of the office between “Start Date” and “End Date”. I will not be checking email while I’m gone.

For assistance with the Contoso, Fourth Coffee, and Tailspin Toys projects, please contact Chester Beane.

For help with the Northwind project, contact Cheryl Jenkins. 

— “Your Name”

Now we can set our automatic replies to turn on the day we leave and turn off the day we get back. This is a great Step 1. However, we all know Outlook has other features we can use to help us keep our inbox under control.

Now, We can can move on to Step 2 Creating rules.

Rules allow us to forward, delete or file mails in folders for any incoming email based on a from email address, text in the subject line or in the mail content.

After Vacation

What if you weren’t as organized as in the example above before you left on vacation?

Let’s follow the scenario without the above replies and rules as we attempt to deal with an overloaded inbox after a ten-day vacation. We did set up an automatic reply, but he didn’t give our coworkers any instructions while we were away.

When we return from our vacation, we have 1243 messages in our inbox. Luckily, we have Outlook as part of our Microsoft 365 subscription, so we can quickly and easily sort, filter, and deal with those messages using a few key Outlook features.

  • Step:
    1. Sort
    2. Filter
    3. Search
    4. Group

First, we sort our messages by priority. This places all of the high priority messages—those we’ll have to deal with quickly—at the top of the inbox.

Sort your messages by importance.

To do this, we select the By Date dropdown at the top of the message list and chooses Importance. This sorts the inbox for us.

We can now spend fifteen minutes answering the five High importance messages, file them into folders, and then change the sort order by clicking the dropdown again and selecting Low on top to bring the Low importance messages to the top of our message list. These messages get only a quick scan, and then we delete all but one of them. “Lunch invitations”, a “fire drill notification”, and a “warning about a power outage” three days ago aren’t messages we need to reply to.

Ethical Considerations

This course is intended for participants who want to improve their skill set even more, or are support staff.

Dozens of States poised to consider privacy legislation

Dozens of states are expected to consider privacy legislation in 2022, as California begins rulemaking for its newly revised consumer privacy law. “It’s no longer a Democrat thing or a Republican thing, and you’re increasingly seeing calls for greater privacy from both,” said Al Saikali, who heads the privacy and data security practice at Shook Hardy & Bacon.

How Secure is your Data?

Get ready for the Windows 11 Insider Preview

Windows 11 Insider Preview

Check out the updated hardware requirements for Windows 11 and find out how Windows Insiders can get started with a Windows 11 Insider Preview build.

Since launching Windows 10 six years ago, a lot of hardware innovation has happened in the PC space. For Windows to move forward and take better advantage of the latest innovations, we need to update the baseline system requirements for modern PCs. As a result, Windows 11 has updated hardware requirements which will be reflected in the Windows Insider Program. This blog post will outline what this means for Insiders new to flighting as well as Insiders who have already been flighting Insider Preview builds.

Microsoft Safety Scanner

Microsoft Safety Scanner

People can download the scanner and check to see if they have any malware and also clean their computers. Check if you have the 32Bit or 64Bit OS, click on the link and select save then click on the view in folder, double click the file and watch what happens

Microsoft Safety Scanner is a scan tool designed to find and remove malware from Windows computers. Simply download it and run a scan to find malware and try to reverse changes made by identified threats.

Windows 11

Windows 11

Microsoft has announced the first Insider Preview for Windows 11.

I was under the impression that Windows 10 was the last version on Windows with half year and annual updates. It seems that this planned pandemic has caused more ructions than we could have imagined. What we have been able to find out that the NSA have been spying on anyone and everyone over the past. They have been working with Microsoft, Linux, Apple and all hard disk and router manufactures to have spyware and backdoors in all operating systems worldwide. They have been the people hat have helped create the internet, all security software being used worldwide.

With the end of the current age and as we head into a new era, there are many changes forecast. One, a new Quantum internet (QI) is being put in place, one where hacking will be eliminated and second a new Quantum Financial system (QFS). This will require many changes to the O/S if we are to retain our current computing power.

So with Microsoft releasing a new OS at this time makes me think that this could be a release that could have everything ready for a switch over to the new QI.

Windows 11 Bug Bash July 7—July 14!

Dealing with Ransomware

Dealing with Ransomware

Coalition to create framework for dealing with ransomware
Major tech firms including Microsoft and McAfee, as well as research groups and other organizations, are creating a coalition to address cyberattacks against entities in government, education, health care and other critical sectors. The Ransomware Task Force will focus on threat reduction, tech solutions and the development of a standard framework for responding to ransomware for all industries to follow.
Full Story: ZDNet (12/22), StateScoop (12/21)

Create a Bootable USB Flash Drive

Create a bootable USB Flash drive

Applies To: Windows Server 2016 Essentials, Windows Server 2012 R2 Essentials, Windows Server 2012 Essentials

You can create a bootable USB flash drive to use to deploy Windows Server Essentials. The first step is to prepare the USB flash drive by using DiskPart, which is a command-line utility. For information about DiskPart, see DiskPart Command-Line Options.

 Tip

To create a bootable USB flash drive for use in recovering or reinstalling Windows on a PC instead of a server, see Create a recovery drive.

For additional scenarios in which you may want to create or use a bootable USB flash drive, see the following topics:

To create a bootable USB flash drive

  1. Insert a USB flash drive into a running computer.
  2. Open a Command Prompt window as an administrator.
  3. Type diskpart.
  4. In the new command line window that opens, to determine the USB flash drive number or drive letter, at the command prompt, type list disk, and then click ENTER. The list disk command displays all the disks on the computer. Note the drive number or drive letter of the USB flash drive.
  5. At the command prompt, type select disk <X>, where X is the drive number or drive letter of the USB flash drive, and then click ENTER.
  6. Type clean, and the click ENTER. This command deletes all data from the USB flash drive.
  7. To create a new primary partition on the USB flash drive, type create partition primary, and then click ENTER.
  8. To select the partition that you just created, type select partition 1, and then click ENTER.
  9. To format the partition, type format fs=ntfs quick, and then click ENTER. ImportantIf your server platform supports Unified Extensible Firmware Interface (UEFI), you should format the USB flash drive as FAT32 rather than as NTFS. To format the partition as FAT32, type format fs=fat32 quick, and then click ENTER.
  10. Type active, and then click ENTER.
  11. Type exit, and then click ENTER.
  12. When you finish preparing your custom image, save it to the root of the USB flash drive.