Replace a Classic Root Site

Replacing root site with a new modern site is a two-step process. Make sure you have the latest PowerShell module for SharePoint Online installed (16.0.8812.1200 or later). To get the installed PowerShell module version, use the following:

1(Get-Module-NameMicrosoft.Online.SharePoint.PowerShell).Version.ToString()

Step 1: 

Create a new modern SharePoint site collection using a communication site template and customize it as per your requirements, such as adding necessary resources like document libraries, navigation, etc. You can also use any existing modern communication site in your SharePoint environment. This will be your new top-level site.

Step 2:

Execute the Invoke-SiteSwap cmdlet to start replacing the old site with the new One
Here is the SharePoint Online PowerShell script to swap a new SharePoint site in place of the old site collection. As its name suggests, the Invoke-SPOSiteSwap PowerShell command swaps a site collection with another one, while taking a backup of the source site collection. Also, it creates a site redirect from the source location to the target location (unless you disable it with -DisableRedirection switch!).

The Root site swap process may take a moment to complete. Please note that the source and target sites can’t connect to an Office 365 group. They also can’t be hub sites or associated with a hub (Remove the Hub site association before swapping and re-associate). Typically, it takes a few minutes to complete. All subsites contained with the source and target sites will be swapped, and this cmdlet takes the following parameters:

  • SourceURL – New site collection that you want to swap with your old site. The source site must be an existing classic team site (STS#0), Modern Team Site (STS#3), or Communication Site (SITEPAGEPUBLISHING#0)
  • TargetURL – This is your existing Classic site in the Office 365 tenant.
  • ArchiveURL – Archival URL is the location to archive an existing site. It must not currently exist (even as a deleted site in Recycle bin). This allows you to roll back your changes if required.

The Invoke-SPOSiteSwap cmdlet doesn’t convert your classic site collection into a modern one. Instead, it replaces the current site collection with another existing one! Moreover, any static link must be fixed manually.

Summary

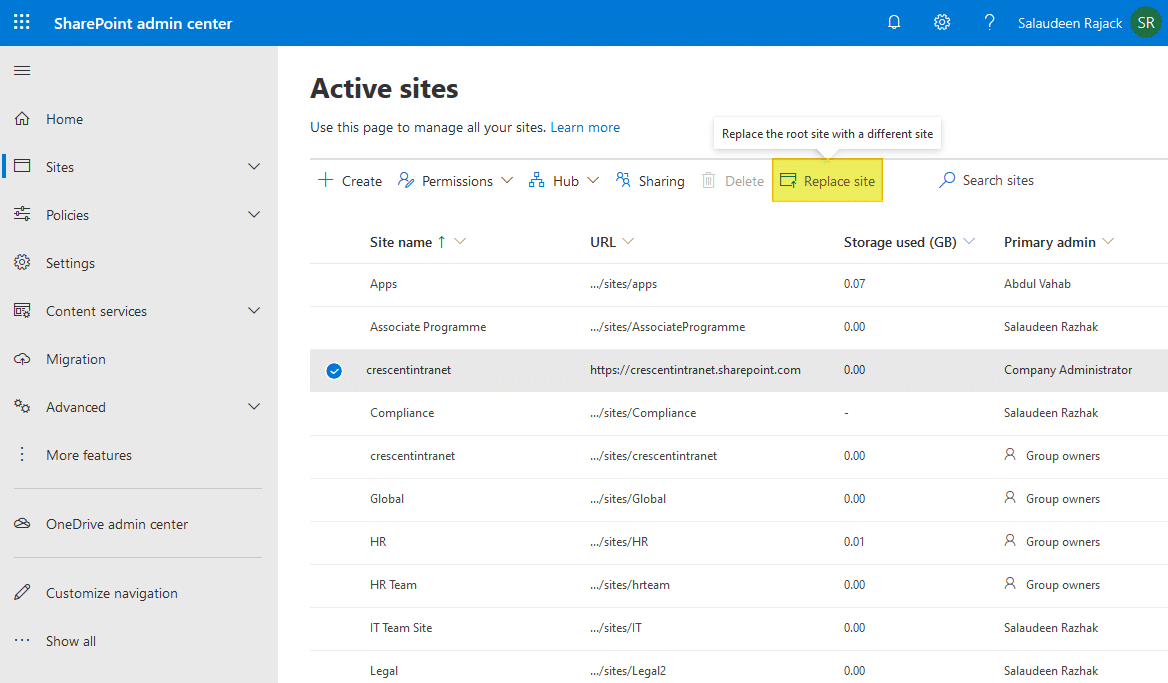
In conclusion, replacing the classic root site collection with a modern site in SharePoint Online can be accomplished using either SharePoint Admin Center or PowerShell. This process can be useful when you’re looking to modernize your SharePoint Online environment and take advantage of the new features and functionalities available on modern sites. Overall, replacing the classic root site collection with a modern communication site that offers a modern user interface that is more visually appealing, Mobile-Friendly, advanced web parts, and intuitive, responsive user experience helps to increase productivity and collaboration.

Microsoft 365

Replacing a Classic SharePoint root site with a Modern Communications site

SharePoint Online: How to Replace a Classic Root Site Collection with a Modern Site?

Requirement: Convert SharePoint Online Root site collection from a classic to a modern site! Our requirement is, We have built a new Intranet based on a Modern SharePoint Communication site and want to replace it with the root site.

SharePoint Online root site collections are created as a classic experience by default, in the past we had no options to convert from classic to modern (and we couldn’t delete and re-create the root site in the past!). We now have a way to replace the classic root with a modern Communications site! We can do this from the Admin center or from a PowerShell prompt or the new SharePoint Online Management Shell and then using the Invoke-SPOSiteSwap cmdlet. The newly introduced Invoke-SPOSiteSwap cmdlet can be used to migrate the SharePoint Online site from classic to modern. In this guide, I will show you how to replace a classic SharePoint Online root site with a modern communication site. I will cover the PowerShell option in a future post.

The process of changing the root site in SharePoint Online Admin Center:

  1. Login to SharePoint Admin Center >> Expand Sites and then Active Sites.
  2. Create a new communication site or modern Team site without Office 365 group. E.g., https://crescent.sharepoint.com/sites/intranet.
  3. Now, from the sites list, select the existing root site, and click on the “Replace site” button in the toolbar.

Both Source and Destination Sites must exist. Past the URL of the new site to be used into the “Site you want to Use”. The checker will verify that it is a valid URL and that it is a Communications site.

4. Click Save “Save”.

This will replace the root site with the new site you’ve entered. The existing root site will also be saved as an archive.

phishing kit

New sophisticated phishing kit skyrockets in use

A new phishing kit called Tycoon 2FA has quickly become one of the most used adversary-in-the-middle kits, with more than 1,100 domain names reported from October 2023 to February 2024, Sekoia ApS’ “Threat Detection & Research” team reports. Aside from its sophisticated techniques and ability to bypass multifactor authentication, Tycoon 2FA poses a significant threat to the cybersecurity landscape due to its potential link with other known phishing platforms, the researchers say.

Full Story: SiliconAngle (3/25) 

Do you really think that you are safe? I have been talking about this for a while now and telling people that every device is compromised and somewhere and somehow a hacker will get your data. Spyware has been build in to each and every device available. This is why we will soon be switching over to a new OS called a Quantum device. I suspect that it will be pushed to every device and the switch will be handled within a 10 day period.

In the meanwhile stay safe.

Python Hack

Python developers targeted by info-stealing hackers

#Python developers have been targeted in a “far-reaching” operation and may have unknowingly downloaded malware while collecting codes for their projects, Checkmarx researchers say. The hackers aimed to steal browser data and crypto wallet files from the developers, targeting mostly individual developers with publicly exposed projects and active members of Top.gg, a community of bot creators for #Discord.
Full Story: The Record by Recorded Future (3/26)

Be aware, you may have a prowler.

Remove Search from Task bar

Not everyone want to take up the space on the task bar with the search box. Thankfully, there is a way for those that no longer want it, to disable the search bar and return to a more minimalist taskbar. The process is simple, and the best part is that the search function still works.

To disable the search bar, right-click on the taskbar, hover your mouse over the “Search” in the context menu, and then click “Hidden”. Bingo, this hides the search bar from the taskbar.

Right-click on the taskbar, then select “Hidden” under “Search” to hide the search bar.

Display a Code snippet in Word

This short post will help you display code snippets in MS Word preserving format and syntax highlighting?

There are more ways, but this is the best way for me to add a code snippet:

Go to Insert tab, Text section, click Object button (it’s on the right side)
Choose OpenDocument Text which will open a new embedded word document
Copy and paste your code from Visual Studio / Eclipse inside this embedded word page
Save and close

Advantages

The result looks very nice. Here are the advantages of this method:
The code keeps its original layout and colors
The code is separated from the rest of the document, as if it was a picture or a chart
Spelling errors won’t be highlighted in the code (this is cool !)

Leaders and Leadership

Leaders are not infallible, they are men and women who choose to be the support for a team of dedicated individuals to achieve their goals. Teaching, Coaching and guiding the team to great height’s.

Leadership, Mentorship and Support

Leaders, must be aware of any risks that they are taking and reconstruct the scenario in their own heads to be able to use any setbacks or challenges as opportunities to grow. This is the shift that can transform their emotions and outcome experience to overcome pre-performance issues by viewing them as a positive or as an exciting challenge to learn rather than a failure. They have to consider that there is no failure as long as they use any experience to learn and continue to grow, to keep trying again in their quest to achieve not only their personal goals, but also their companies goals. Leaders have to be prepared to take chances and to accept any setbacks based on their choices. It is their responsibility, no matter who dropped the ball. A leader is the end of the line as far as responsibility goes.

Reset the video driver

1.

To reset the video driver on Windows 10, you can use the keyboard shortcut Win + Ctrl + Shift + B.

This will cause the screen to flicker for a few seconds or go black for a second, and then everything will return to normal.

This method is safe and won’t affect running apps and opened documents. If the driver is misbehaving a lot, chances are that it has gone corrupt. Another way to restart the driver is by disabling and re-enabling the Display adapter from Device Manager. It is important to check if the Windows Key is not disabled as it can accidentally shift the focus.

2.

Reset the Graphics Card Driver Using Device Manager

If you are still facing display issues even after applying the keyboard shortcut to refresh your graphics card driver, you can try resetting it with the Device Manager.

Device Manager is available on all Windows versions and provides a list of all the hardware components connected to your PC. Here, you can find the graphics card driver as well, which can be reset if needed.

Here are the steps to use the Device Manager to reset the graphics card driver:

  1. First, open the Device Manager by searching for it in the Windows search box and clicking on the Device Manager icon from the Start menu.launch device manager from start menu
  2. Then, locate and expand the Display adapters section in the Device Manager window.
  3. Right-click on your graphics card driver and select Properties from the context menu.graphics card properties
  4. Under the Properties window, switch to the Driver tab and click on the Disable Device button.disable graphics card driver
  5. Confirm the disable action and wait for a few moments.
  6. After the driver is disabled, again right-click on your graphics card driver, and select Properties from the menu that appears.
  7. Switch to the Driver tab, and click on the Enable Device button.enable device driver
  8. Wait for the driver to be re-enabled.

This action will reset your graphics card driver and may clear up any display issues you were having.

3. Uninstall and Reinstall the Graphics Driver to Reset It

If nothing else works, you can try uninstalling and reinstalling the graphics driver. Uninstalling the driver will remove it from your system completely, which should resolve any possible glitches or compatibility issues that might have been causing the display problems.

To uninstall and then reinstall the graphics card driver on Windows, follow these steps:

  1. First, open the Device Manager by searching for it in the Windows search box and clicking on the Device Manager icon from the Start menu.
  2. Then, locate and expand the Display adapters section.
  3. Right-click on your graphics card driver and select Uninstall device from the context menu.uninstall graphics driver
  4. Confirm the uninstall action to remove all its files completely.
  5. After the driver is removed, reboot your device.
  6. Windows will detect a missing driver and prompt you to install it automatically. If not, head to your graphics card manufacturer’s website and download the suitable drivers for your device.

More blank page tricks

Word for Microsoft 365, Word 20XX

Page breaks tell Word where to start a new page. A manual page break might be making an unwanted blank page in your document.

  1. To see manual page breaks, switch to showing paragraph marks: Press Ctrl+Shift+8.
  2. Now you can select the page break and delete it.

A page break at the bottom of a Word page

Section break problems

In the middle of a document, deleting section breaks can cause formatting problems. In these cases, try changing the section break to one that doesn’t generate a new page. Here’s how:

  1. Double select the section break.
  2. On the Layout tab of the Page Setup dialog box, select the Section start drop down and select Continuous.
  3. Select OK.

Odd, Even, and Next cause blank pages
Next Page, Odd Page, and Even Page section breaks may create a blank page in your document. If the blank page occurs at the end of your document and you have a section break there, place your cursor directly before the section break and press Delete.

Tip: To more easily find section breaks, try switching to Draft on the View tab.

Word Delete Blank Page

Word for Microsoft 365 Word for Microsoft 365 for Mac Word 2021

Word includes a non-deleteable end-paragraph that sometimes gets pushed out to a new, blank page at the end of a document. The way to delete the page is to make the end-paragraph fit onto the preceding page. The most sure-fire way is to make the end-paragraph very small (1 point):

  1. Press Ctrl+Shift+8 to show paragraph marks.
  2. Select the paragraph mark.
  3. Select inside the Font size box, type 01, and then press Enter .Setting font size to 1
  4. The paragraph now fits on the preceding page, removing the unwanted blank page.
  5. Press Ctrl+Shift+8 again to hide the paragraph marks (⌘+8 on a Mac).

If that paragraph still doesn’t fit on the preceding page, you can make the bottom margin smaller (Layout tab > Margins Custom Margins, and set the bottom margin to something small, like 0.3 inches).

Tip: If the paragraph mark has a square bullet next to it, the paragraph might have the Page break before option turned on. To turn it off, right-select the empty paragraph, select Paragraph Settings (Home tab), and on the Lines and Page Breaks tab of the dialog box, uncheck Page break before.